Fast Static Website Deployment Using AWS And Pulumi
This is a submission for the Pulumi Deploy and Document Challenge: Fast Static Website Deployment What I Built For this challenge, I successfully deployed a basic web page using Infrastructure as Code (Pulumi), AWS S3 Bucket and CloudFront. This project used the following tool: AWS S3 Bucket for Static Website Hosting AWS CloudFront which serves as a Content Delivery Network (CDN) for global distribution, caching, and HTTPS support. Automating Cloud Resources Using Pulumi Live Demo Link Demo Link Project Repo Github Repo My Journey In this project, I used the following technologies: Web Page: HTML Cloud Provider: AWS Infrastructure as Code: Pulumi Programming Language: Python Prerequisites Before you begin, ensure you have: AWS Account: You can sign up for a free tier AWS account if you don’t have one. You'll need this to create and access the S3 bucket and CloudFront Services. AWS CLI installed and configured with your credentials. IAM User Account: Create an IAM (Identity Access Management) user with full access and permissions to use the S3 and CloudFront services. You’ll need an IAM User instead of using your main account. Pulumi Account: You can sign up for a Pulumi account if you don't have one. You will need this to be able to access your projects and stacks. Pulumi CLI: You can install the Pulumi CLI Here. You'll use it to login and automate your resources. Python3.6 or higher Basic understanding of python Basic understanding of AWS services 1. Configure AWS Credential in the CLI: After installing the AWS CLI, You need to configure your AWS CLI to enable you to connect and access your account. Run the following command to configure your AWS CLI: aws configure Enter the following details: AWS_ACCESS_KEY_ID= # From IAM user security credentials AWS_SECRET_ACCESS_KEY= # From IAM user security credentials DEFAULT_REGION= 2. Configure Pulumi CLI: After configuring the AWS CLI, you need to configure the Pulumi CLI to enable you to access and manage your project and stacks. Run the following command to authenticate your Pulumi CLI: pulumi login You will be prompted to manage your stacks by logging in using your personal access token or hitting the key to sign in using the browser. In this project, I will be using my personal access token to login. To get your personal access token: navigate to your dashboard click on the icon of your profile: Click on the personal access token. Click on Create token You will be asked to add a Description and Expiration of your personal access token. After creating your token, copy and paste your token in the CLI. You should see the following output when you have successfully logged in: 3. Initializing Pulumi Project After you have successfully logged in, you need to initialize a new Pulumi project template to manage your infrastructure as code. In this project, I will be initializing a pulumi aws-python project template. Run the following command to initialize a new pulumi project: pulumi new Select the aws-python template. This template shows that you will be using AWS as your cloud provider and Python as your programming language. You will be prompted to enter the following details: Project name: # Name of the project you want to use Project Description: # Name of your project description Stack: # Name of your stack (e.g. dev, stage, prod....) AWS Region: # The AWS Region you want to deploy your infrastructure You will also be prompted to select the toolchain for installing dependencies and running the program. In this project, I will be selecting pip toolchain. After entering the following details, it will automatically save the configuration, Install the necessary dependencies, and create a virtual environment for your project. 4. Building the application You will need to create a new folder named www in your project directory. This folder will contain the files(index.html) for your website. The index.html file will contain the following code: Deploying A Static Website Pulumi Challenge Deploying A Static Website Welcome to the Pulumi challenge! This is a simple static website deployed using Pulumi. Next, you will need to update the content __main__.py file. This file will contain the infrastructure to automate your resources to AWS. The __main__.py file will contain the following: Import Pulumi Configuration Setting Let's start by creating a variable named config to import the Pulumi Configuration Setting that will: Invoke and access the configuration value stored in the Pulumi..yaml file. Retrieve the value of the path configuration key. config = pulumi.Config() path = config.get("path") or "./www" In your project directory, navigate to the Pulumi..yaml file and add the following code: Fast-Static-Website:path:

This is a submission for the Pulumi Deploy and Document Challenge: Fast Static Website Deployment
What I Built
For this challenge, I successfully deployed a basic web page using Infrastructure as Code (Pulumi), AWS S3 Bucket and CloudFront. This project used the following tool:
- AWS S3 Bucket for Static Website Hosting
- AWS CloudFront which serves as a Content Delivery Network (CDN) for global distribution, caching, and HTTPS support.
- Automating Cloud Resources Using Pulumi
Live Demo Link
Project Repo
My Journey
In this project, I used the following technologies:
- Web Page: HTML
- Cloud Provider: AWS
- Infrastructure as Code: Pulumi
- Programming Language: Python
Prerequisites
Before you begin, ensure you have:
- AWS Account: You can sign up for a free tier AWS account if you don’t have one. You'll need this to create and access the S3 bucket and CloudFront Services.
- AWS CLI installed and configured with your credentials.
- IAM User Account: Create an IAM (Identity Access Management) user with full access and permissions to use the S3 and CloudFront services. You’ll need an IAM User instead of using your main account.
- Pulumi Account: You can sign up for a Pulumi account if you don't have one. You will need this to be able to access your projects and stacks.
- Pulumi CLI: You can install the Pulumi CLI Here. You'll use it to login and automate your resources.
- Python3.6 or higher
- Basic understanding of python
- Basic understanding of AWS services
1. Configure AWS Credential in the CLI:
After installing the AWS CLI, You need to configure your AWS CLI to enable you to connect and access your account. Run the following command to configure your AWS CLI:
aws configure
Enter the following details:
AWS_ACCESS_KEY_ID= # From IAM user security credentials
AWS_SECRET_ACCESS_KEY= # From IAM user security credentials
DEFAULT_REGION=
2. Configure Pulumi CLI:
After configuring the AWS CLI, you need to configure the Pulumi CLI to enable you to access and manage your project and stacks. Run the following command to authenticate your Pulumi CLI:
pulumi login
You will be prompted to manage your stacks by logging in using your personal access token or hitting the
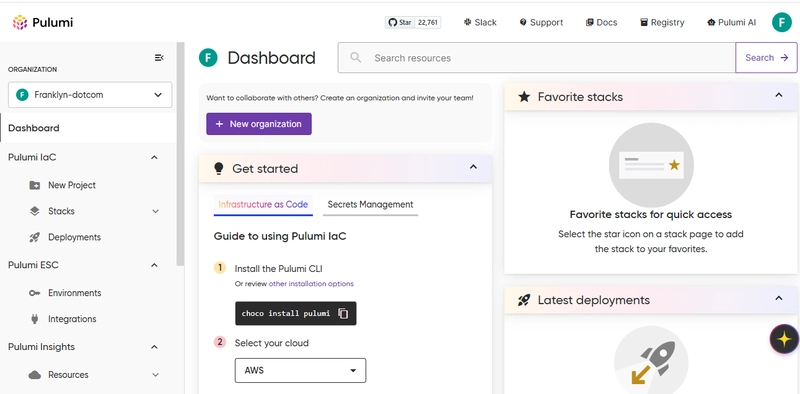
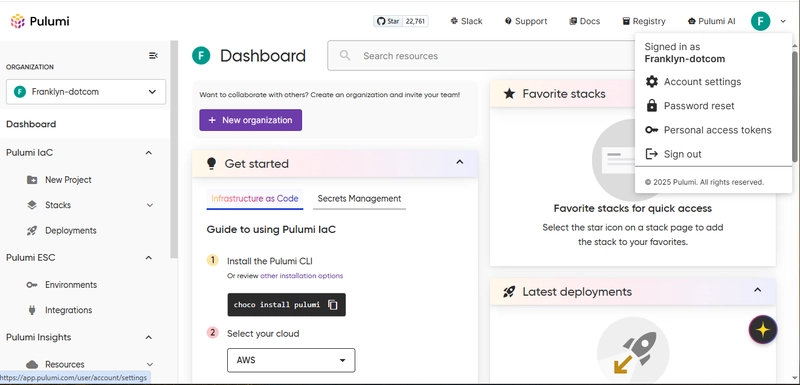
In this project, I will be using my personal access token to login. To get your personal access token:
- navigate to your dashboard
- click on the icon of your profile:
Click on the personal access token.
Click on Create token
You will be asked to add a Description and Expiration of your personal access token.
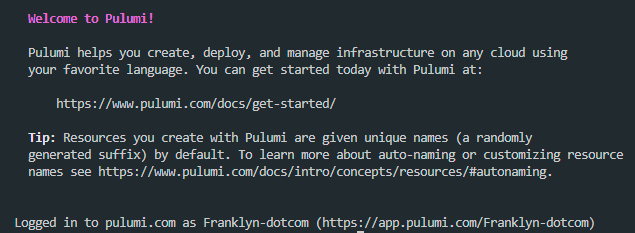
After creating your token, copy and paste your token in the CLI. You should see the following output when you have successfully logged in:
3. Initializing Pulumi Project
After you have successfully logged in, you need to initialize a new Pulumi project template to manage your infrastructure as code. In this project, I will be initializing a pulumi aws-python project template.
Run the following command to initialize a new pulumi project:
pulumi new
Select the aws-python template. This template shows that you will be using AWS as your cloud provider and Python as your programming language.
You will be prompted to enter the following details:
Project name: # Name of the project you want to use
Project Description: # Name of your project description
Stack: # Name of your stack (e.g. dev, stage, prod....)
AWS Region: # The AWS Region you want to deploy your infrastructure
You will also be prompted to select the toolchain for installing dependencies and running the program. In this project, I will be selecting pip toolchain.
After entering the following details, it will automatically save the configuration, Install the necessary dependencies, and create a virtual environment for your project.
4. Building the application
You will need to create a new folder named www in your project directory. This folder will contain the files(index.html) for your website.
The index.html file will contain the following code:
 lang="en">

     charset="utf-8">
    </span>Deploying A Static Website<span class="nt">


    Pulumi Challenge
    Deploying A Static Website
    Welcome to the Pulumi challenge! This is a simple static website deployed using Pulumi.


![[The AI Show Episode 142]: ChatGPT’s New Image Generator, Studio Ghibli Craze and Backlash, Gemini 2.5, OpenAI Academy, 4o Updates, Vibe Marketing & xAI Acquires X](https://www.marketingaiinstitute.com/hubfs/ep%20142%20cover.png)




![[DEALS] The Premium Learn to Code Certification Bundle (97% off) & Other Deals Up To 98% Off – Offers End Soon!](https://www.javacodegeeks.com/wp-content/uploads/2012/12/jcg-logo.jpg)


![From drop-out to software architect with Jason Lengstorf [Podcast #167]](https://cdn.hashnode.com/res/hashnode/image/upload/v1743796461357/f3d19cd7-e6f5-4d7c-8bfc-eb974bc8da68.png?#)


.png?#)


.jpg?#)


_Christophe_Coat_Alamy.jpg?#)
 (1).webp?#)




![Rapidus in Talks With Apple as It Accelerates Toward 2nm Chip Production [Report]](https://www.iclarified.com/images/news/96937/96937/96937-640.jpg)


