![[The AI Show Episode 142]: ChatGPT’s New Image Generator, Studio Ghibli Craze and Backlash, Gemini 2.5, OpenAI Academy, 4o Updates, Vibe Marketing & xAI Acquires X](https://www.marketingaiinstitute.com/hubfs/ep%20142%20cover.png)


![From drop-out to software architect with Jason Lengstorf [Podcast #167]](https://cdn.hashnode.com/res/hashnode/image/upload/v1743796461357/f3d19cd7-e6f5-4d7c-8bfc-eb974bc8da68.png?#)


.png?#)


_Christophe_Coat_Alamy.jpg?#)


.webp?#)


![Apple Considers Delaying Smart Home Hub Until 2026 [Gurman]](https://www.iclarified.com/images/news/96946/96946/96946-640.jpg)
![iPhone 17 Pro Won't Feature Two-Toned Back [Gurman]](https://www.iclarified.com/images/news/96944/96944/96944-640.jpg)
![Tariffs Threaten Apple's $999 iPhone Price Point in the U.S. [Gurman]](https://www.iclarified.com/images/news/96943/96943/96943-640.jpg)


Design and Manage Pub/Sub Messaging with Amazon Simple Notification Service (SNS)
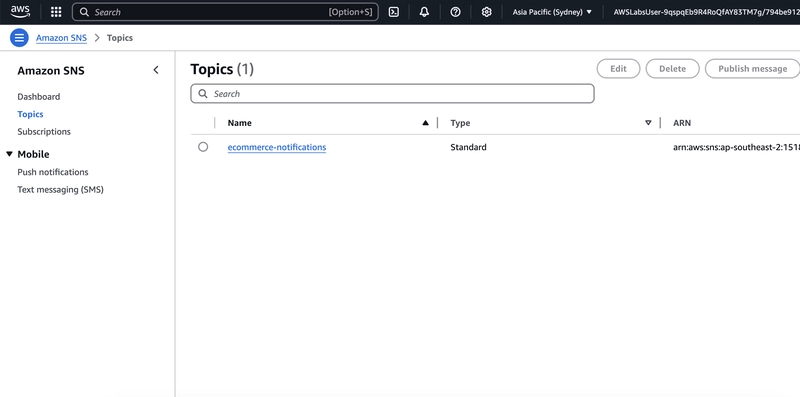
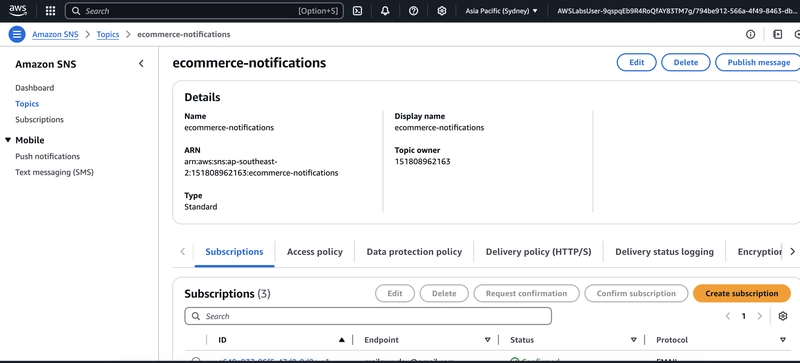
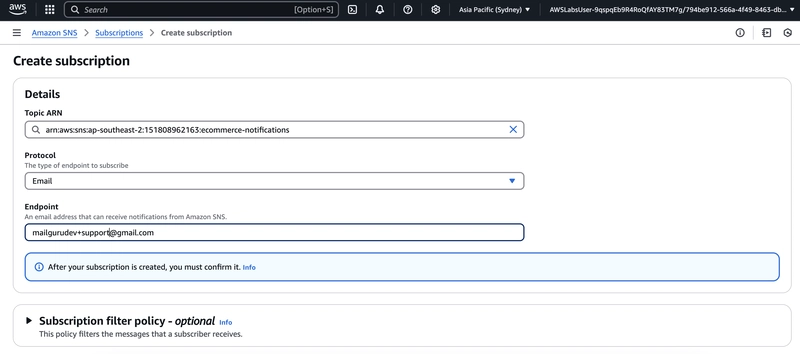
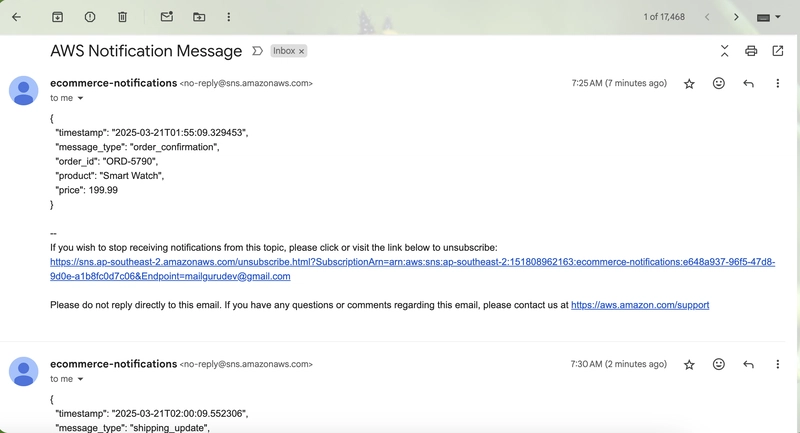
Amazon Simple Notification Service (Amazon SNS) Amazon Simple Notification Service (Amazon SNS) is a fully managed messaging service that enables the coordination of message delivery from publishers to subscribers. It provides a highly available, secure, and scalable messaging infrastructure, allowing applications to send notifications to various endpoints, such as email addresses, mobile devices, or AWS services. With Amazon SNS, you can decouple message producers from consumers, enabling asynchronous communication and event-driven architectures. Objectives Configure message filtering policies in Amazon SNS to control message delivery to subscribers. Set up CloudWatch metrics to monitor SNS message activity. Create SNS topic subscriptions with multi-attribute filtering rules. Use CloudWatch metrics to monitor message delivery and filtering effectiveness. Task 1: Subscribe to an SNS topic Set up multiple subscriptions to the Amazon SNS topic to simulate different teams receiving notifications. You’ll start with a basic subscription and then create additional subscriptions for the customer support and inventory management teams. Task 1.1: Configure Initial Subscription Open Simple Notification Service. select Topics. Select ecommerce-notifications. On the ecommerce-notifications topic page, choose Create subscription. On the Create subscription page, configure the following settings: Topic ARN: The ARN of the ecommerce-notifications topic is already filled in. Leave this unchanged. Protocol: Choose Email. Endpoint: Enter an email address where you can receive notifications during this lab. Note: You can create multiple subscriptions for a single topic, and each subscription can use different protocols including email, SMS (text messages), or other AWS services. This allows you to send the same message to multiple destinations simultaneously. Choose Create subscription. Check your email for a message from AWS Notifications. In the email body, choose the Confirm subscription link. Note: Now that your email address is subscribed to the topic, you will receive a notification whenever a new message is published to it. Task 1.2: Create Team-Specific Subscriptions From the breadcrumbs at the top of the screen, choose the ecommerce-notifications link. On the ecommerce-notifications topic page, choose Create subscription. Configure the following settings: Protocol: Choose Email Endpoint: Enter your email address with +support added before the @ symbol. Example: student+support@example.com Choose Create subscription. Repeat the process for the inventory management team: Return to the ecommerce-notifications page. Choose Create subscription Protocol to Email Endpoint, enter your email address with +inventory added before the @ symbol. Example: student+inventory@example.com Choose Create subscription Task 1.3: Verify All Subscriptions Check your email inbox for two additional confirmation messages from AWS Notifications. Confirm both new subscriptions by clicking the Confirm subscription link in each email. Return to the SNS console and select Subscriptions from the left navigation menu. Verify that you see the following three confirmed subscriptions: Your original email address Your email address with +support Your email address with +inventory Task 2: Monitor SNS Performance with CloudWatch _- Amazon CloudWatch provides valuable insights into the performance and health of your SNS topics. Lets create a dashboard to monitor key metrics, including delivery and failures rates. This visibility helps you ensure your notification system is working efficiently and allows you to quickly identify any potential issues. By tracking metrics like the number of messages published, successful deliveries, and failed notifications, you can: Verify that messages are being delivered to subscribers Identify potential delivery problems Monitor the overall health of your SNS topic Make data-driven decisions about your notification system_ Open CloudWatch. Under Metrics, choose All metrics. In the Metrics search bar, enter SNS and press Enter. In the filtered lit of SNS Metrics, select SNS > Topic Metrics. A list of topics and available metrics appears. Identify the metrics for the ecommerce-notifications topic and select the checkboxes next to the following metrics: NumberOfMessagesPublished NumberOfNotificationsDelivered NumberOfNotificationsFailed - WARNING: Do not select the PublishSize metric. Now that you’ve selected metrics to track, you create a new CloudWatch Dashboard and add them to it. Open the Actions menu at the top of the screen and select Add to dashboard. In the Add to dashboard popup window, choose Create new. Configure the following for your dashboard: Create new dashboard: Enter SNSMetricsDashboard. Widget type: Choose Stacked area. Customize widget title: Enter SNS Performance and Healt
Amazon Simple Notification Service (Amazon SNS)
- Amazon Simple Notification Service (Amazon SNS) is a fully managed messaging service that enables the coordination of message delivery from publishers to subscribers.
- It provides a highly available, secure, and scalable messaging infrastructure, allowing applications to send notifications to various endpoints, such as email addresses, mobile devices, or AWS services.
- With Amazon SNS, you can decouple message producers from consumers, enabling asynchronous communication and event-driven architectures.
Objectives
- Configure message filtering policies in Amazon SNS to control message delivery to subscribers.
- Set up CloudWatch metrics to monitor SNS message activity.
- Create SNS topic subscriptions with multi-attribute filtering rules.
- Use CloudWatch metrics to monitor message delivery and filtering effectiveness.
Task 1: Subscribe to an SNS topic
Set up multiple subscriptions to the Amazon SNS topic to simulate different teams receiving notifications. You’ll start with a basic subscription and then create additional subscriptions for the customer support and inventory management teams.
Task 1.1: Configure Initial Subscription
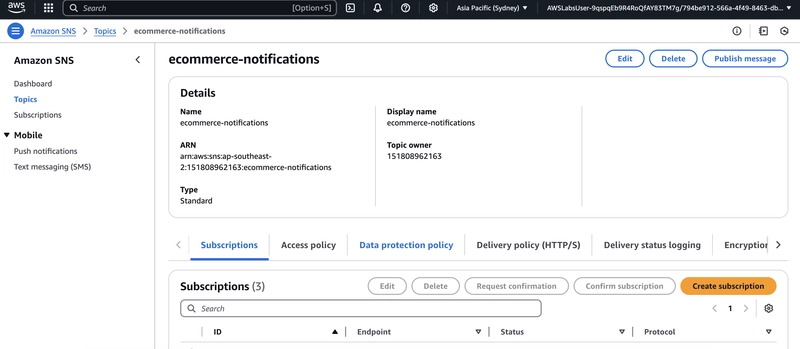
- Open Simple Notification Service.
- select Topics.
- Select ecommerce-notifications.
- On the ecommerce-notifications topic page, choose Create subscription.
- On the Create subscription page, configure the following settings:
- Topic ARN: The ARN of the ecommerce-notifications topic is already filled in. Leave this unchanged.
- Protocol: Choose Email.
- Endpoint: Enter an email address where you can receive notifications during this lab.
- Note: You can create multiple subscriptions for a single topic, and each subscription can use different protocols including email, SMS (text messages), or other AWS services. This allows you to send the same message to multiple destinations simultaneously.
- Choose Create subscription.
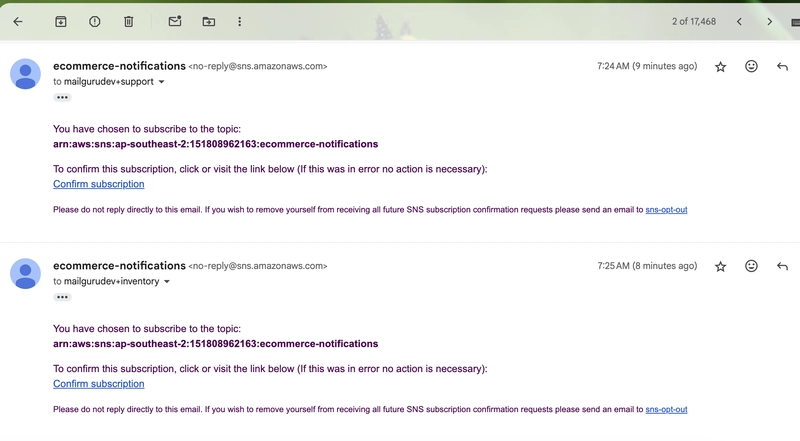
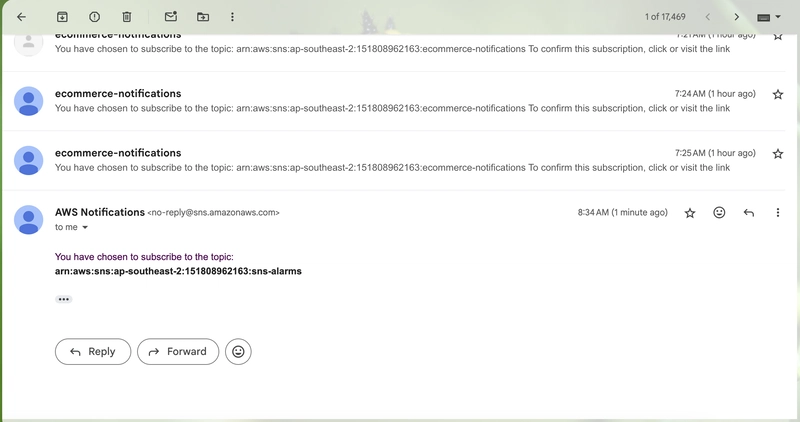
- Check your email for a message from AWS Notifications.
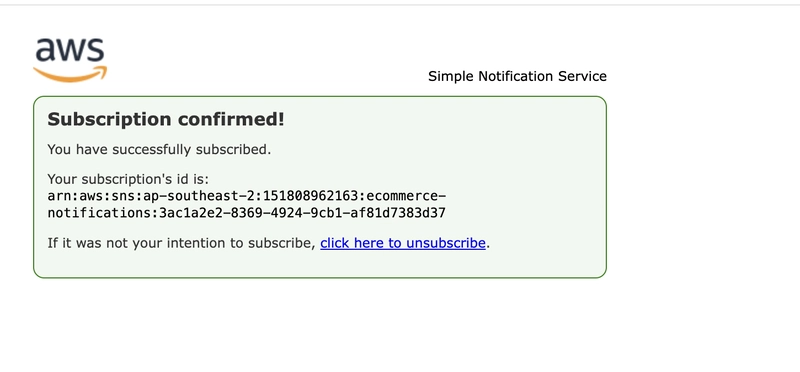
- In the email body, choose the Confirm subscription link.
- Note: Now that your email address is subscribed to the topic, you will receive a notification whenever a new message is published to it.
Task 1.2: Create Team-Specific Subscriptions
- From the breadcrumbs at the top of the screen, choose the ecommerce-notifications link.
- On the ecommerce-notifications topic page, choose Create subscription.
- Configure the following settings:
- Protocol: Choose Email
- Endpoint: Enter your email address with +support added before the @ symbol. Example: student+support@example.com
- Choose Create subscription.
- Repeat the process for the inventory management team:
- Return to the ecommerce-notifications page.
- Choose Create subscription
- Protocol to Email
- Endpoint, enter your email address with +inventory added before the @ symbol. Example: student+inventory@example.com
- Choose Create subscription
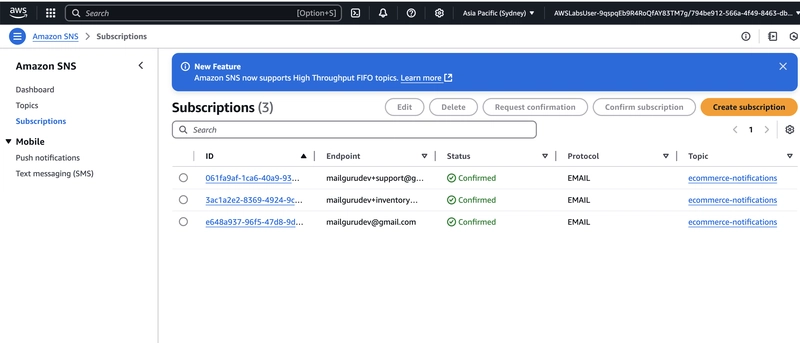
Task 1.3: Verify All Subscriptions
- Check your email inbox for two additional confirmation messages from AWS Notifications.
- Confirm both new subscriptions by clicking the Confirm subscription link in each email.
- Return to the SNS console and select Subscriptions from the left navigation menu.
- Verify that you see the following three confirmed subscriptions:
- Your original email address
- Your email address with +support
- Your email address with +inventory
Task 2: Monitor SNS Performance with CloudWatch
_- Amazon CloudWatch provides valuable insights into the performance and health of your SNS topics.
- Lets create a dashboard to monitor key metrics, including delivery and failures rates.
- This visibility helps you ensure your notification system is working efficiently and allows you to quickly identify any potential issues.
-
By tracking metrics like the number of messages published, successful deliveries, and failed notifications, you can:
- Verify that messages are being delivered to subscribers
- Identify potential delivery problems
- Monitor the overall health of your SNS topic
- Make data-driven decisions about your notification system_
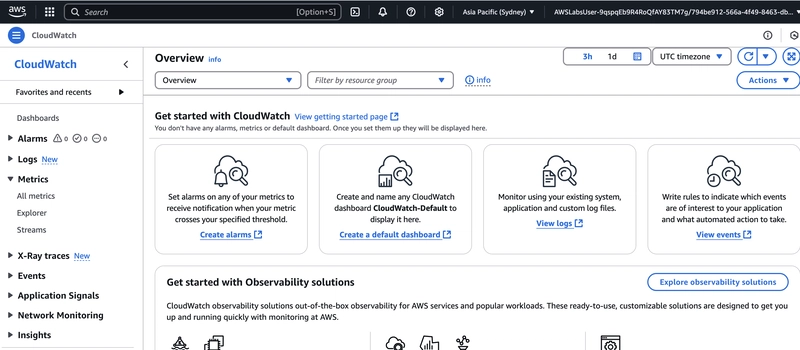
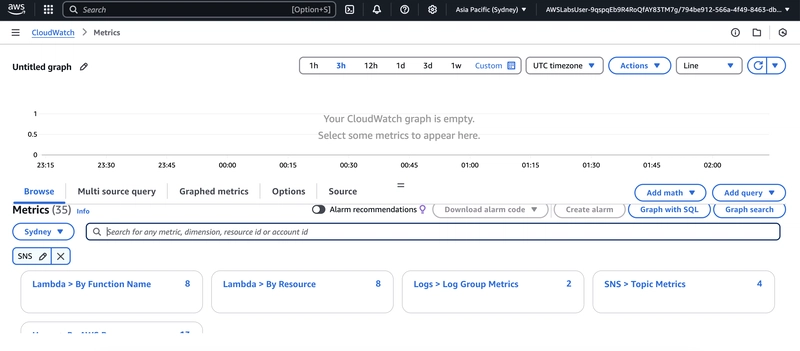
Open CloudWatch.
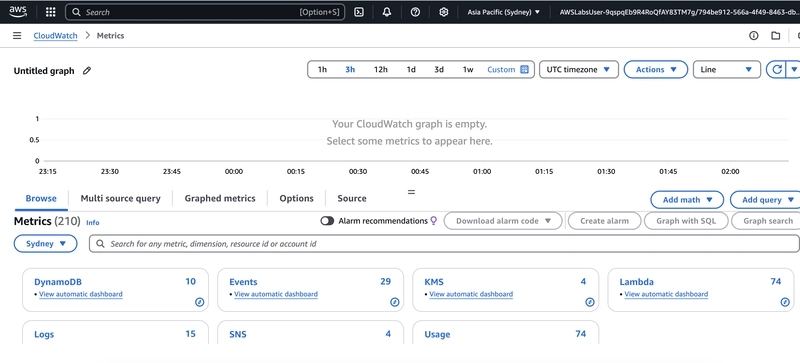
Under Metrics, choose All metrics.
In the Metrics search bar, enter SNS and press Enter.
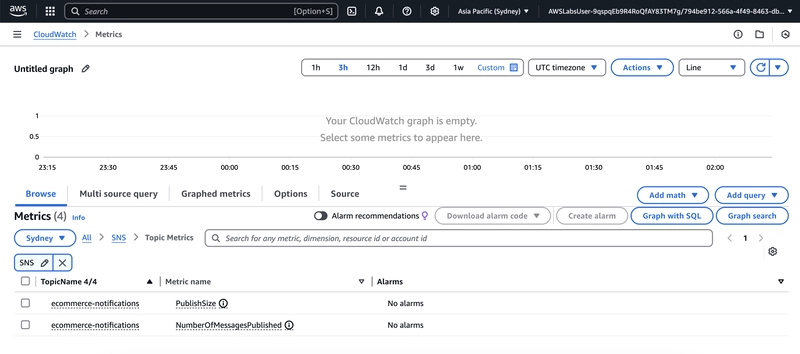
In the filtered lit of SNS Metrics, select SNS > Topic Metrics.
A list of topics and available metrics appears.
-
Identify the metrics for the ecommerce-notifications topic and select the checkboxes next to the following metrics:
- NumberOfMessagesPublished
- NumberOfNotificationsDelivered
- NumberOfNotificationsFailed - WARNING: Do not select the PublishSize metric.
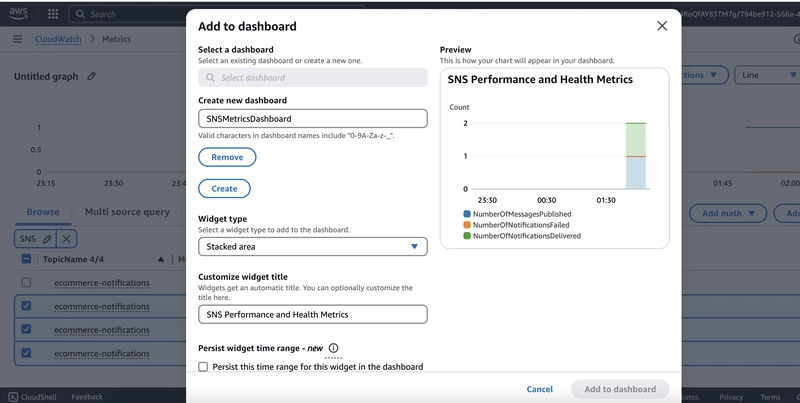
Now that you’ve selected metrics to track, you create a new CloudWatch Dashboard and add them to it.
Open the Actions menu at the top of the screen and select Add to dashboard.
In the Add to dashboard popup window, choose Create new.
-
Configure the following for your dashboard:
- Create new dashboard: Enter SNSMetricsDashboard.
- Widget type: Choose Stacked area.
- Customize widget title: Enter SNS Performance and Health Metrics.
Choose the Create button.
Choose Add to dashboard button.
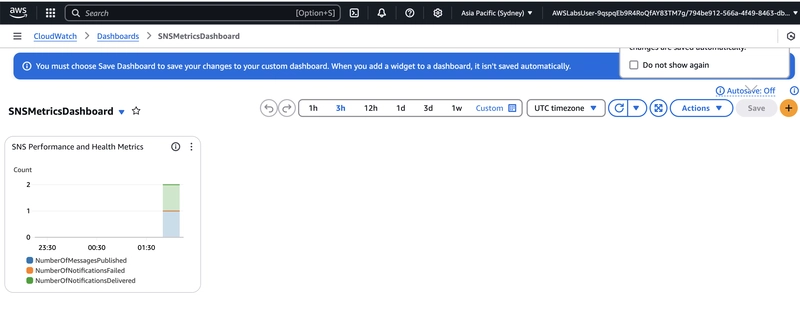
Save
Task 3: Implement Message Filtering
- Implementing message filtering to ensure that different teams receive only the notifications relevant to their responsibilities. You work with an existing Lambda function that publishes various types of messages to your SNS topic:
- High-value order notifications for the sales team
- Support tickets for the customer service team
- Inventory alerts for the warehouse team
- By configuring message filtering policies, you’ll ensure that each team receives only the notifications they need to act upon, reducing noise and improving operational efficiency.
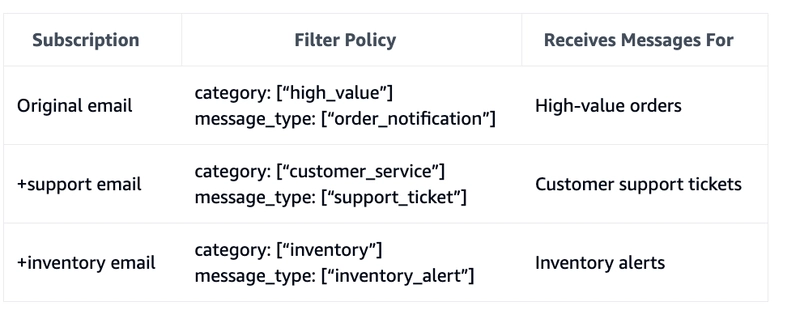
Task 3.1: Configure Filtering Policies
- Open Simple Notification Service.
- Choose Subscriptions.
- You start by updating the main subscription (your original email address).
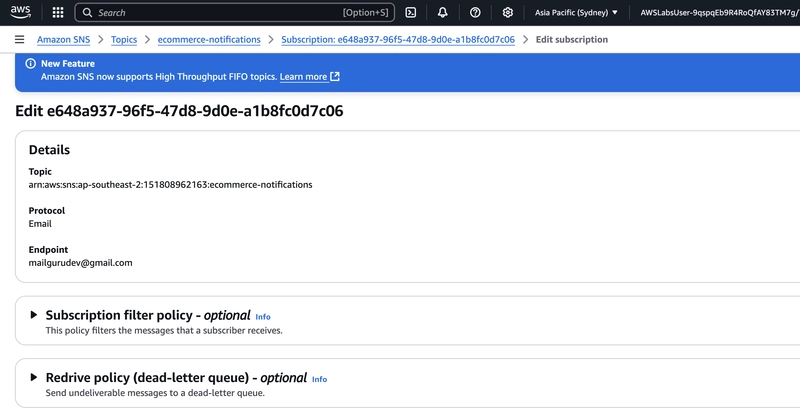
- Select the radio next to the subscription with your original email address and choose the Edit button at the top of the screen.
- On the Edit subscription screen, expand the Subscription filter policy - optional section.
- Use the Subscription filter policy toggle button to enable filtering for this subscription.
- Note: The filter policy scope in Amazon SNS determines whether filter conditions are applied to message attributes or the message body. Choosing Message attributes applies filtering based on metadata, whereas Message body filters based on content, allowing precise control over message delivery to subscribers.
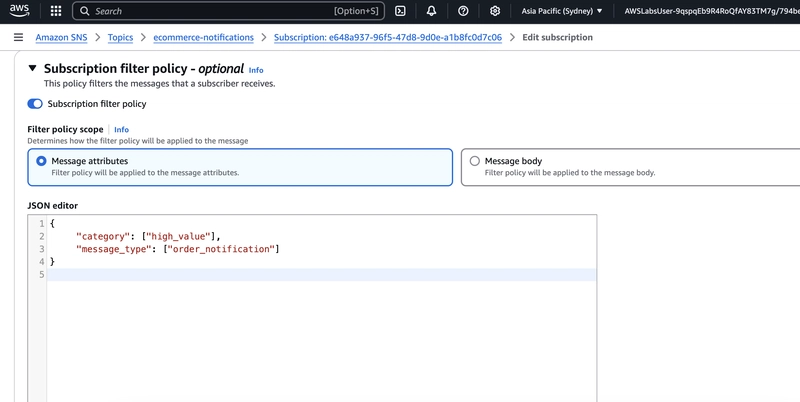
- Choose Message attributes.
- In the JSON editor text box, enter the following policy:
{
     "category": ["high_value"],
     "message_type": ["order_notification"]
}
- Save
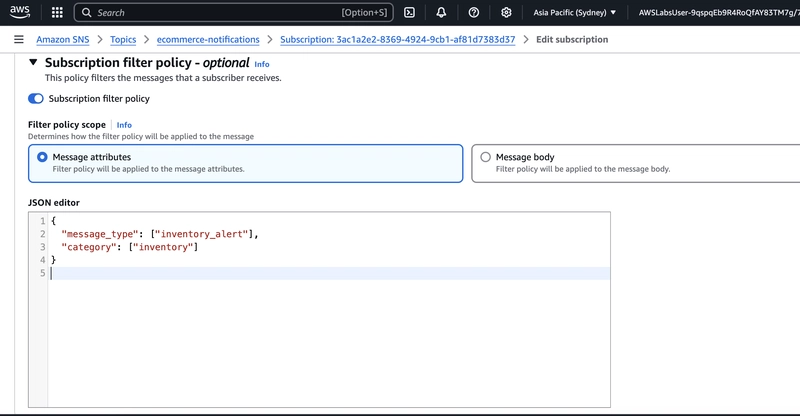
- Repeat the same for support and inventory subscriptions.
{
  "message_type": ["support_ticket"],
  "category": ["customer_service"]
}
{
  "message_type": ["inventory_alert"],
  "category": ["inventory"]
}

Task 3.2: Test Message Filtering
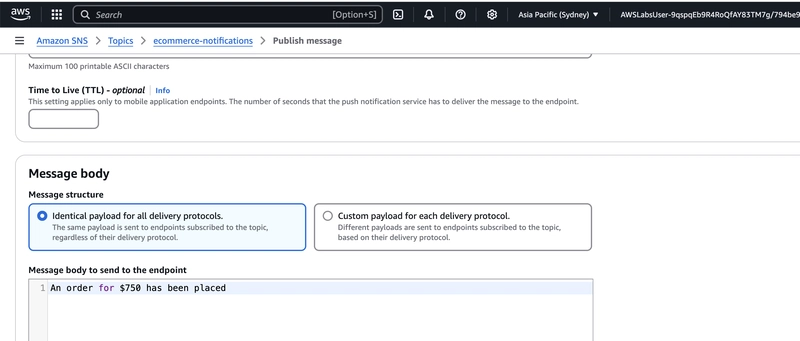
- Return to the Topics page and select your topic.
- Choose Publish message.
- Start by confirming that your main email address receives notifications when high value orders are placed.
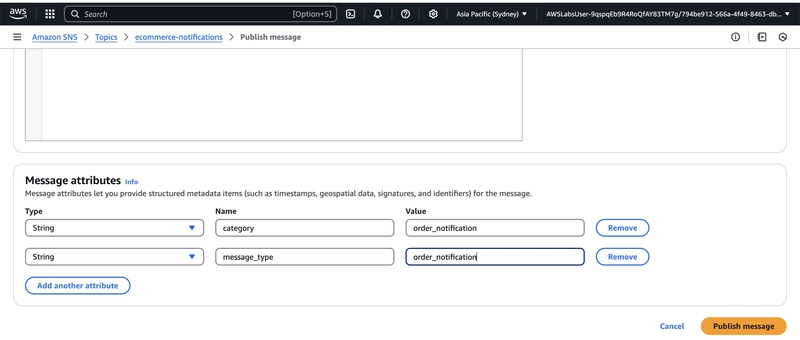
- Choose the Publish message button at the top of the screen and create a test message for a high value order:
- Subject: Enter Test - High value order alert
- Message body: Enter An order for $750 has been placed
- Add message attribute:
- Type: Choose String
- Name: Enter category
- Value: Enter high_value
- Choose Add another attribute
- Add message attribute:
- Type: Choose String
- Name: Enter message_type
- Value: Enter order_notification
- Choose Publish message
- Check your email inbox:
- Look at the email header and confirm that it was sent to your original email address The +support and +inventory aliases should not receive this message Note: When using multiple attributes in a filter policy, SNS applies an AND operation between them. This means a subscription will only receive a message if ALL attributes in its filter policy match the message’s attributes. For example, given the policy you just created:
{
     "category": ["high_value"],
     "message_type": ["order_notification"]
}
Your email address will only receive notification that have both:
category = high_value AND
message_type = order_notification
This powerful filtering capability has many applications beyond e-commerce. For example:
- A weather alert system could filter by both severity (critical) AND location (west-coast)
- A security monitoring system could filter by both threat level (high) AND asset type (database)
- A manufacturing system could filter by both machine status (maintenance-required) AND facility location (plant-A)
- This allows you to create very specific routing rules for your messages, ensuring that subscribers only receive the exact subset of messages they need to act upon.
Now test that your support team subscription receives customer service tickets.
-
Choose the Publish message button at the top of the screen and create the following test message for support tickets:
- Subject: Enter Test - Customer support ticket
- Message body: Enter New support ticket opened
- Add message attribute:
- Type: Choose String
- Name: Enter category
- Value: Enter customer_service
- Choose Add another attribute
- Add message attribute:
- Type: Choose String
- Name: Enter message_type
- Value: Enter support_ticket
Choose Publish message
Check your email inbox:
Look at the email header and confirm that it was sent to your +support email address
Your original email and +inventory alias should not receive this message
-
Create a test message for inventory alerts:
- Subject: Enter Test - Inventory alert
- Message body: Enter Low stock warning
- Add message attribute:
- Type: Choose String
- Name: Enter category
- Value: Enter inventory
-
Choose Add another attribute
- Add message attribute:
- Type: Choose String
- Name: Enter message_type
- Value: Enter inventory_alert
- Choose Publish message
Check your email inbox:
Look at the email header and confirm that it was sent to your +inventory email address
Your original email and +support alias should not receive this message
The following table shows a summary of your filtering configuration:
Task 4: Analyze SNS Performance Using CloudWatch
Task 4.1: Review and update CloudWatch Dashboard
- Choose CloudWatch.
- choose Dashboards.
- Select the dashboard named SNSMetricsDashboard that you created earlier.
- Note: To adjust the dashboard size, look for the resize handle in the bottom-right corner. You can drag this handle to increase the viewing area of your dashboard.
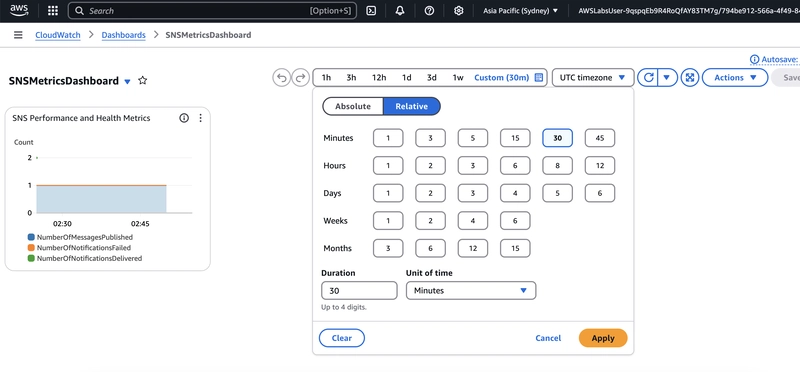
- In the time series bar above the dashboard, select Custom and then choose 30 minutes.
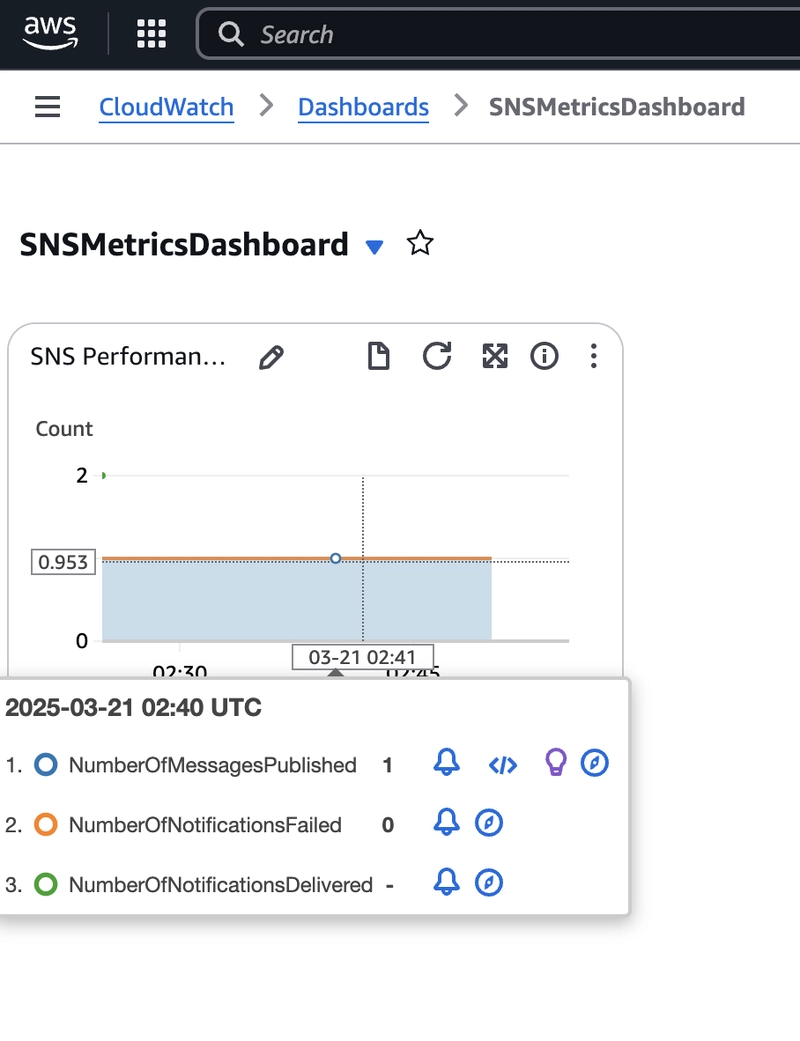
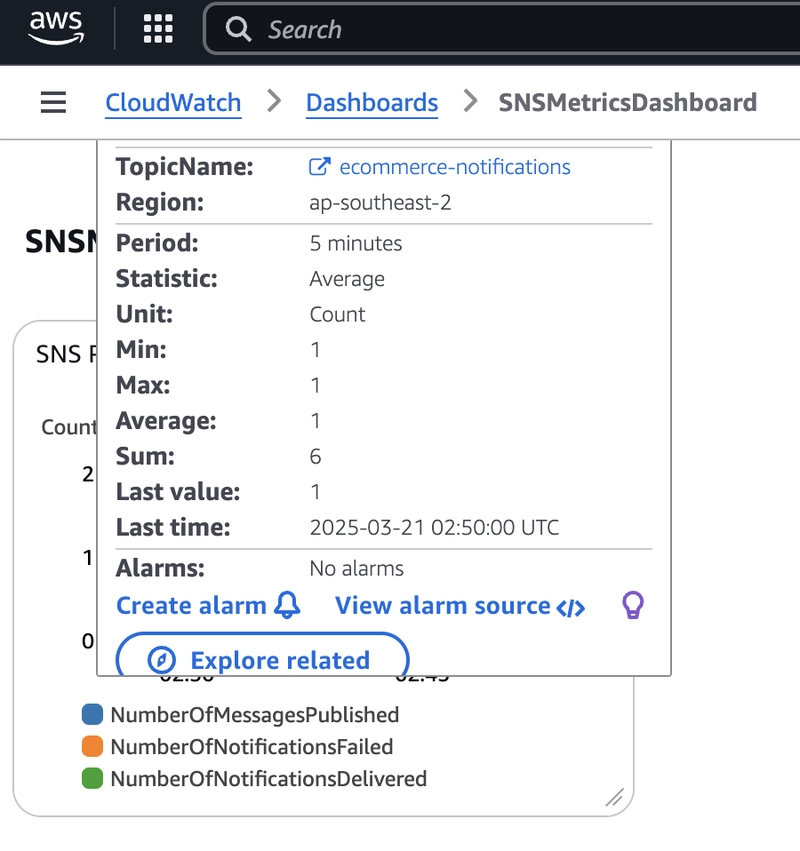
- In the dashboard, observe the following metrics:
- NumberOfMessagesPublished: Shows how many messages the Lambda function is publishing
- NumberOfNotificationsDelivered: Shows successful message deliveries to subscribers
- NumberOfNotificationsFailed: Shows failed delivery attempts
- Note: You should see:
- The number of MessagesPublished should be largely consistent, as this is controlled by a Lambda function triggering at regular intervals
- Few or no NotificationsFailed (indicating successful delivery)
- Hover over any data point in the graphs to see exact values at that time.
- Now, let’s investigate how filtering has affected your SNS topic.
- In the upper-right corner of your dashboard, select the icon with three vertical dots.
- From the menu that appears on screen, choose Edit.
- Choose the Browse tab.
- Enter NumberOfNotificationsFilteredOut-MessageAttributes in the search bar and press Enter.
- Choose SNS > Topic Metrics.
- Select the checkbox next to ecommerce-notifications and then choose Update widget.
- Choose Save.
- With the additional metric added to your dashboard, you can now see how filtering has affected your SNS topic.
Task 4.2: Create CloudWatch Alarms
- In the CloudWatch console, expand the navigation menu by choosing the menu icon in the upper-left corner, then open the Alarms menu and select All alarms.
- Choose Create alarm.
- Choose Select metric.
- Select the Browse tab.
- Enter NumberOfNotificationsFailed in the search bar and press Enter.
- Choose SNS > Topic Metrics.
- Select the checkbox next to ecommerce-notifications and then choose Select metric.
- Configure the following alarm conditions:
- Under Metric, leave the default settings
- Under Conditions:
- For Threshold type, choose Static
- For Whenever NumberOfNotificationsFailed is…, choose Greater
- For than…, enter 0
- Note: This alarm will trigger whenever any message fails to deliver. Setting the threshold to 0 ensures you’re notified of even a single failure, which is important for maintaining reliable message delivery in a production environment.
- Choose Next.
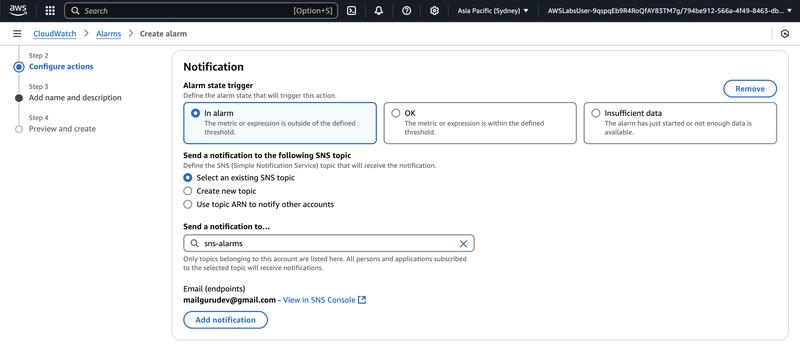
- Configure the notification:
- Under Notification, choose Create new topic
- For Create a new topice, enter sns-alarms
- For Email endpoints, enter your email address
- Choose Create topic
- Choose Next.
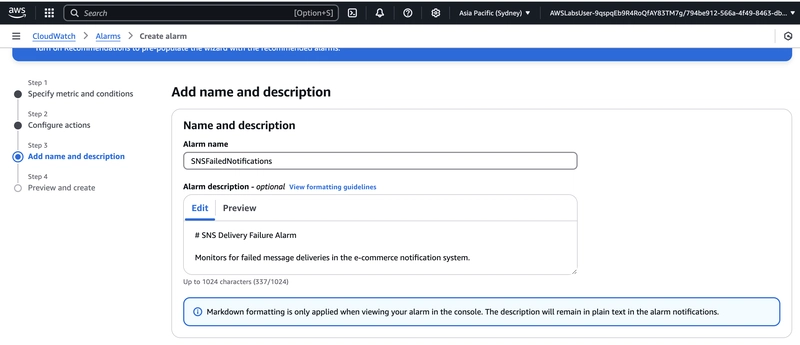
- For Alarm name, enter SNSFailedNotifications.
- Choose Next.
- Review your alarm configuration and choose Create alarm.
- Check your email and confirm the subscription to the new SNS topic.
Review
- Configured message filtering policies in Amazon SNS to control message delivery to subscribers.
- Set up CloudWatch metrics to monitor SNS message activity.
- Created SNS topic subscriptions with multi-attribute filtering rules.
- Used CloudWatch metrics to monitor message delivery and filtering effectiveness.