![[The AI Show Episode 142]: ChatGPT’s New Image Generator, Studio Ghibli Craze and Backlash, Gemini 2.5, OpenAI Academy, 4o Updates, Vibe Marketing & xAI Acquires X](https://www.marketingaiinstitute.com/hubfs/ep%20142%20cover.png)


![From drop-out to software architect with Jason Lengstorf [Podcast #167]](https://cdn.hashnode.com/res/hashnode/image/upload/v1743796461357/f3d19cd7-e6f5-4d7c-8bfc-eb974bc8da68.png?#)


.png?#)


_Christophe_Coat_Alamy.jpg?#)
 (1).webp?#)


![iPhone 17 Pro Won't Feature Two-Toned Back [Gurman]](https://www.iclarified.com/images/news/96944/96944/96944-640.jpg)
![Tariffs Threaten Apple's $999 iPhone Price Point in the U.S. [Gurman]](https://www.iclarified.com/images/news/96943/96943/96943-640.jpg)


Deploying a Two-Tier Web Application on AWS with MySQL and Apache
In this blog, I will guide you through step-by-step instructions to set up a two-tier architecture on AWS using VPC, Subnets, Internet Gateway, Route Tables, RDS, EC2, Apache, MySQL, PHP, and HTML. This project will allow you to host a registration web application where users can submit their details, which will be stored in an RDS MySQL database. Step 1: Create a VPC 1.1 Login to AWS Management Console Navigate to the VPC service Click Create VPC Enter the following details: VPC Name: my-vpc IPv4 CIDR Block: 10.0.0.0/16 Tenancy: Default Click Create VPC Step 2: Create Subnets 2.1 Create a Public Subnet Go to VPC > Subnets Click Create Subnet Choose my-vpc Set Subnet Name: public-subnet IPv4 CIDR Block: 10.0.1.0/24 Click Create 2.2 Create a Private Subnet Repeat the steps above but set: Subnet Name: private-subnet IPv4 CIDR Block: 10.0.2.0/24 Step 3: Create an Internet Gateway (IGW) and Attach to VPC 3.1 Create IGW Go to VPC > Internet Gateways Click Create Internet Gateway Set Name: your-igw Click Create IGW 3.2 Attach IGW to VPC Select your-igw Click Actions > Attach to VPC Choose my-vpc and click Attach Step 4: Configure Route Tables 4.1 Create a Public Route Table Go to VPC > Route Tables Click Create Route Table Set Name: public-route-table Choose my-vpc and click Create Edit Routes → Add a new route: Destination: 0.0.0.0/0 Target: my-igw Edit Subnet Associations → Attach public-subnet Step 5: Create an RDS Database (MySQL) Go to RDS > Create Database Choose Standard Create Select MySQL Set DB instance identifier: my-rds Master Username: admin Master Password: yourpassword Subnet Group: Select private-subnet VPC Security Group: Allow 3306 (MySQL) from my-vpc Click Create Database Step 6: Launch an EC2 Instance Go to EC2 > Launch Instance Choose Ubuntu 22.04 Set Instance Name: my-ec2 Select my-vpc and attach public-subnet Security Group: Allow SSH (22) from your IP HTTP (80) from anywhere MySQL (3306) from my-vpc Click Launch Instance Step 7: Install Apache, PHP, and MySQL Client 7.1 Connect to EC2 ssh -i your-key.pem ubuntu@your-ec2-public-ip 7.2 Install LAMP Stack sudo apt update && sudo apt install -y apache2 php libapache2-mod-php php-mysql mysql-client 7.3 Start Apache sudo systemctl start apache2 sudo systemctl enable apache2 Step 8: Configure Web Application 8.1 Create the Registration Form cd /var/www/html sudo nano index.html Registration Form User Registration Name: DOB: Email: 8.2 Create PHP Script (submit.php) sudo nano /var/www/html/submit.php Step 9: Test the Application Restart Apache sudo systemctl restart apache2 Open your browser and visit: http://your-ec2-public-ip/ Fill in the form and Submit Check MySQL Database: mysql -u admin -p -h your-rds-endpoint USE your_database; SELECT * FROM table_name; This setup ensures a scalable, secure, and high-availability application on AWS!
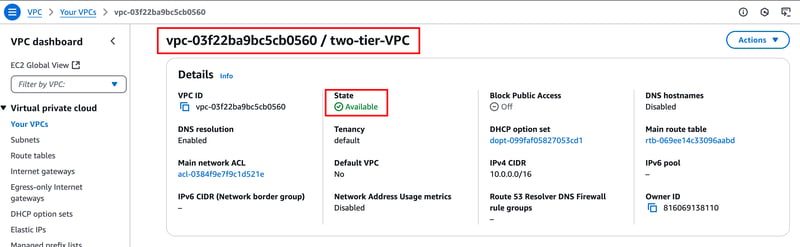
In this blog, I will guide you through step-by-step instructions to set up a two-tier architecture on AWS using VPC, Subnets, Internet Gateway, Route Tables, RDS, EC2, Apache, MySQL, PHP, and HTML. This project will allow you to host a registration web application where users can submit their details, which will be stored in an RDS MySQL database.
Step 1: Create a VPC
1.1 Login to AWS Management Console
- Navigate to the VPC service
- Click Create VPC
- Enter the following details:
- VPC Name: my-vpc
- IPv4 CIDR Block: 10.0.0.0/16
- Tenancy: Default
- Click Create VPC
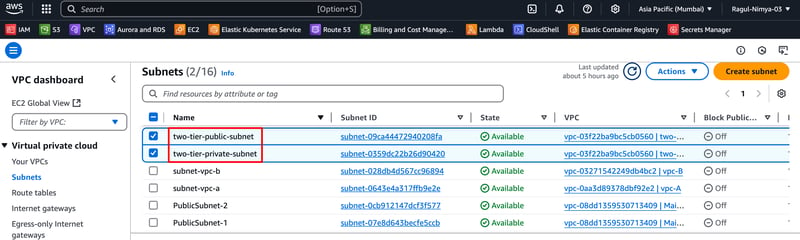
Step 2: Create Subnets
2.1 Create a Public Subnet
- Go to VPC > Subnets
- Click Create Subnet
- Choose my-vpc
- Set Subnet Name: public-subnet
- IPv4 CIDR Block: 10.0.1.0/24
- Click Create
2.2 Create a Private Subnet
Repeat the steps above but set:
- Subnet Name: private-subnet
- IPv4 CIDR Block: 10.0.2.0/24
Step 3: Create an Internet Gateway (IGW) and Attach to VPC
3.1 Create IGW
- Go to VPC > Internet Gateways
- Click Create Internet Gateway
- Set Name: your-igw
- Click Create IGW 3.2 Attach IGW to VPC
- Select your-igw
- Click Actions > Attach to VPC
- Choose my-vpc and click Attach

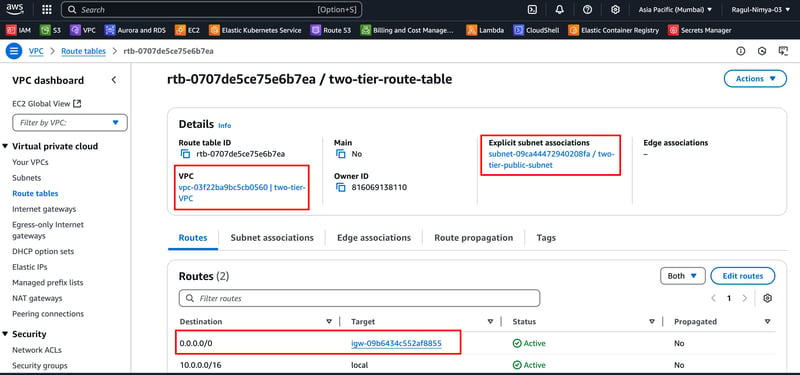
Step 4: Configure Route Tables
4.1 Create a Public Route Table
- Go to VPC > Route Tables
- Click Create Route Table
- Set Name: public-route-table
- Choose my-vpc and click Create
- Edit Routes → Add a new route:
- Destination: 0.0.0.0/0
- Target: my-igw
- Edit Subnet Associations → Attach public-subnet
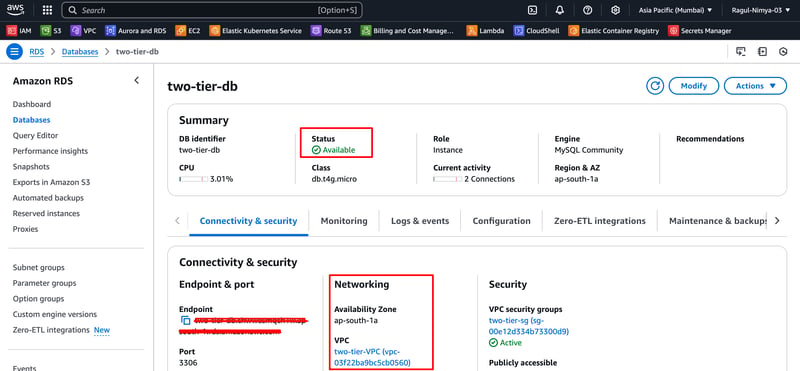
Step 5: Create an RDS Database (MySQL)
- Go to RDS > Create Database
- Choose Standard Create
- Select MySQL
- Set DB instance identifier: my-rds
- Master Username: admin
- Master Password: yourpassword
- Subnet Group: Select private-subnet
- VPC Security Group: Allow 3306 (MySQL) from my-vpc
- Click Create Database
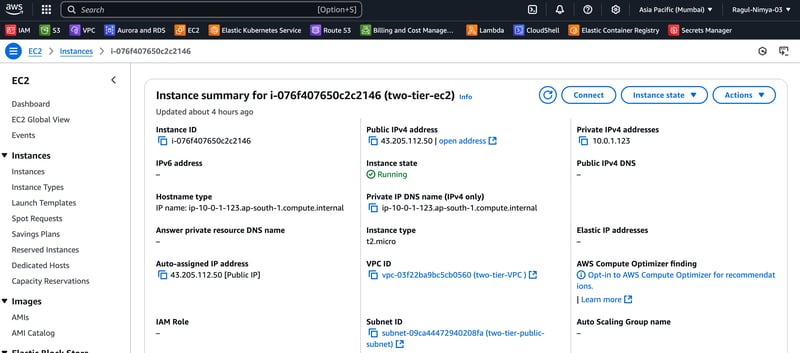
Step 6: Launch an EC2 Instance
- Go to EC2 > Launch Instance
- Choose Ubuntu 22.04
- Set Instance Name: my-ec2
- Select my-vpc and attach public-subnet
- Security Group: Allow
- SSH (22) from your IP
- HTTP (80) from anywhere
- MySQL (3306) from my-vpc
- Click Launch Instance
Step 7: Install Apache, PHP, and MySQL Client
7.1 Connect to EC2
ssh -i your-key.pem ubuntu@your-ec2-public-ip
7.2 Install LAMP Stack
sudo apt update && sudo apt install -y apache2 php libapache2-mod-php php-mysql mysql-client
7.3 Start Apache
sudo systemctl start apache2
sudo systemctl enable apache2
Step 8: Configure Web Application
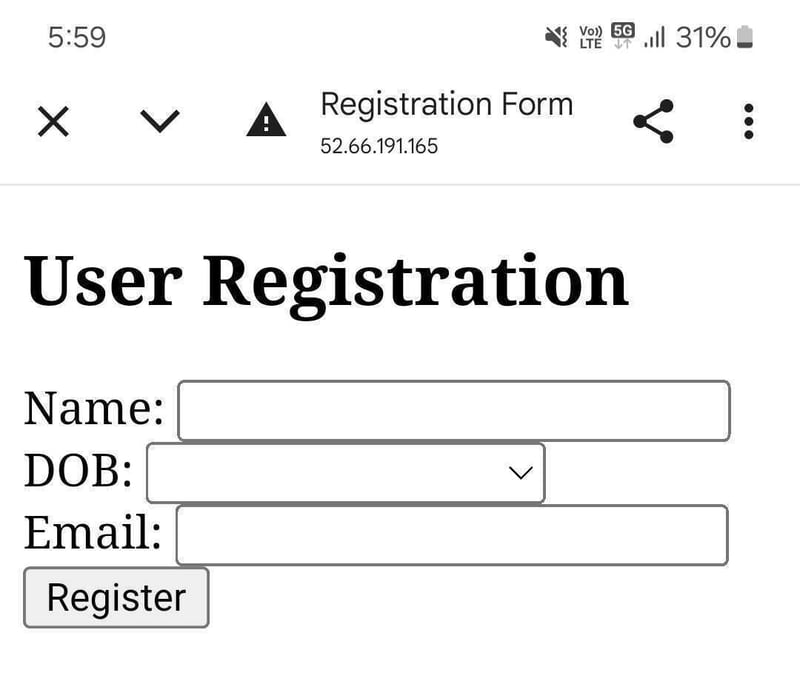
8.1 Create the Registration Form
cd /var/www/html
sudo nano index.html
Registration Form
User Registration
8.2 Create PHP Script (submit.php)
sudo nano /var/www/html/submit.php
connect_error) {
    die("Connection failed: " . $conn->connect_error);
}
$name = $_POST['name'];
$dob = $_POST['dob'];
$email = $_POST['email'];
$stmt = $conn->prepare("INSERT INTO users (name, dob, email) VALUES (?, ?, ?)");
$stmt->bind_param("sss", $name, $dob, $email);
if ($stmt->execute()) {
    echo "Registration successful";
} else {
    echo "Error: " . $stmt->error;
}
$stmt->close();
$conn->close();
?>
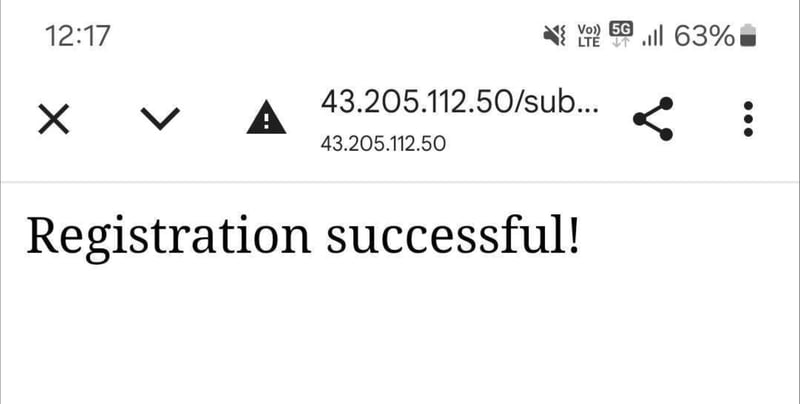
Step 9: Test the Application
- Restart Apache sudo systemctl restart apache2
- Open your browser and visit: http://your-ec2-public-ip/
- Fill in the form and Submit
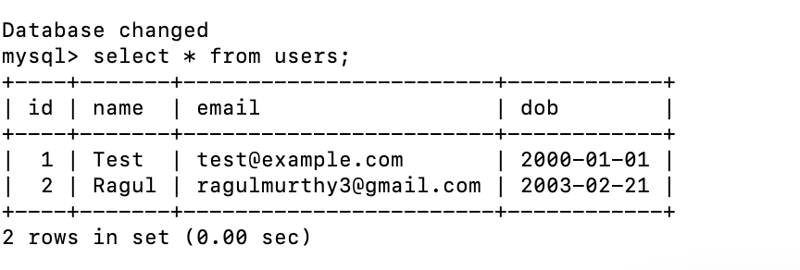
- Check MySQL Database:
mysql -u admin -p -h your-rds-endpoint
USE your_database;
SELECT * FROM table_name;
This setup ensures a scalable, secure, and high-availability application on AWS!