![[The AI Show Episode 142]: ChatGPT’s New Image Generator, Studio Ghibli Craze and Backlash, Gemini 2.5, OpenAI Academy, 4o Updates, Vibe Marketing & xAI Acquires X](https://www.marketingaiinstitute.com/hubfs/ep%20142%20cover.png)


![From drop-out to software architect with Jason Lengstorf [Podcast #167]](https://cdn.hashnode.com/res/hashnode/image/upload/v1743796461357/f3d19cd7-e6f5-4d7c-8bfc-eb974bc8da68.png?#)


.png?#)


_Christophe_Coat_Alamy.jpg?#)
 (1).webp?#)


![Apple Considers Delaying Smart Home Hub Until 2026 [Gurman]](https://www.iclarified.com/images/news/96946/96946/96946-640.jpg)
![iPhone 17 Pro Won't Feature Two-Toned Back [Gurman]](https://www.iclarified.com/images/news/96944/96944/96944-640.jpg)
![Tariffs Threaten Apple's $999 iPhone Price Point in the U.S. [Gurman]](https://www.iclarified.com/images/news/96943/96943/96943-640.jpg)


Deploy Scalable VPC Architecture on AWS Cloud
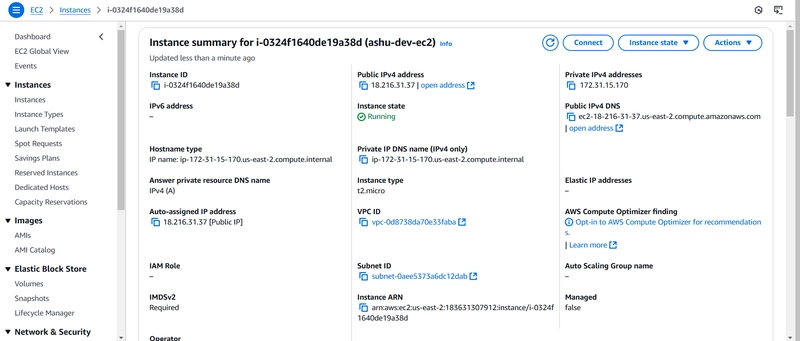
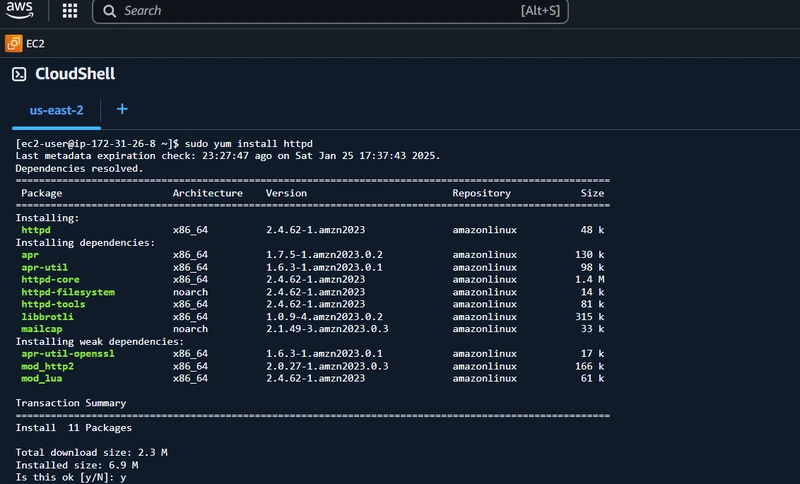
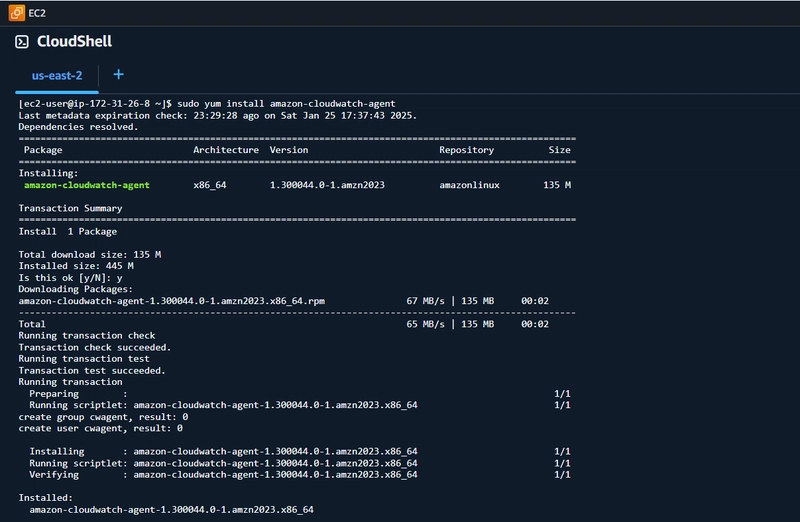
Deploy a Modular and Scalable Virtual Network Architecture with Amazon VPC. Pre-Requisites 1] AWS Account: Ensure you have an AWS account with necessary permissions (IAM Role or User with privileges). 2] Source Code: Prepare the web application repository hosted on GitHub/ BitBucket. Pre-Deployment 3] Golden AMI: Launch an EC2 instance with a public subnet. (Ubuntu 24.0) 4] Install dependencies: Update sudo and install Apache Web server, Git, CloudWatch Agent, and AWS SSM Agent. Install Apache Web Server: sudo yum install httpd sudo enable systemctl httpd sudo start systemctl httpd Install Git sudo yum install git -y git --version Install CloudWatch Agent □ Download the CloudWatch Agent- sudo yum install amazon-cloudwatch-agent □ Configure and start the agent: - sudo systemctl enable amazon-cloudwatch-agent □ Save the File: Ensure the file is saved at this path: /opt/aws/amazon-cloudwatch-agent/bin/memory_metrics.json. □ Example command to copy the file: sudo cp /home/ubuntu/VPC-Architecture/VPC Architecture/memory_metrics.json /opt/aws/amazon-cloudwatch-agent/bin/memory_metrics.json □ Apply the Configuration File: If you prefer to keep the file in the original location, run: ```sudo /opt/aws/amazon-cloudwatch-agent/bin/amazon-cloudwatch-agent-ctl -a fetch-config -m ec2 -c file:/home/ubuntu/VPC-Architecture/VPC\Architecture/memory_metrics.json -s  - Install AWS SSM Agent □ Install the AWS SSM Agent - sudo yum install amazon-ssm-agent -y  □ Start and check status of cloud watch service: - `sudo systemctl start amazon-cloudwatch-agent` `sudo systemctl status amazon-cloudwatch-agent`  - Navigate to the **CloudWatch Dashboard** in AWS and go to **Metrics**. You should see the custom metrics created.  - Check the CloudWatch logs captured in amazon-cloudwatch-agent.log  5] **Create AMI - Amazon Master Image** - Navigate to the AWS EC2 Dashboard. - Select the Stopped EC2 Instance. - From the Actions Menu, choose: □ Image and templates > Create Image. - Provide the following details: □ Image Name: Give your AMI a descriptive name, e.g., GoldenAMI-v1. □ Description: Mention what this AMI includes. □ No Reboot: Leave unchecked (default) to ensure a clean AMI. - Click Create Image and wait for the process to complete.  6] **Test the Golden AMI** by launching new EC2 instance with created AMI - Launch an EC2 Instance from the Golden AMI - Log in to your AWS Management Console. - Go to the EC2 Dashboard. - Click on Launch Instance and choose My AMIs. - Select your Golden AMI and configure the instance settings: □ Select an instance type (e.g., t2.micro for testing). □ Attach the appropriate security group. □ Assign a public IP for SSH testing. □ Add necessary storage if required. □ Assign an IAM role that matches your AMI's requirements (e.g., SSM access). □ update the user data with script in the image   7] **Verify Connectivity** - Connect to the instance using SSH :ssh -i "key_name.pem" ubuntu@ec2-18-222-53-96.us-east-2.compute.amazonaws.com - Create a new IAM role and assign to EC2 **Step 1: Access the IAM Console** 1. Go to the IAM Console. 2. Click on the "Create role" button. **Step 2: Specify Trusted Entity** 1. Select trusted entity type: Choose AWS service. 2. Use case for other AWS service: Select EC2. 3. Click Next. **Step 3: Attach Policies** 1. Search for and select the following policies: _AmazonSSMManagedInstanceCore_ (required for SSM functionality) _CloudWatchAgentServerPolicy_ (if you're using CloudWatch Agent for monitoring). 2. Click Next. **Step 4: Add Tags (Optional)** 1. Add any tags if required for identification or cost tracking. 2. Click Next. **Step 5: Review and Create** 1. Provide a Role name: Example- **EC2_SSM_Access_Role**. 2. Review the permissions and confirm that AmazonSSMManagedInstanceCore is included. 3. Click Create role. **Step 6: Attach Role to the EC2 Instance** 1. Go to the **EC2 Console**. 2. Select the instance you want to associate the role with. 3. Click Actions > Security > **Modify IAM Role**. 4. Select the newly cr
Deploy a Modular and Scalable Virtual Network Architecture with Amazon VPC.
Pre-Requisites
1] AWS Account: Ensure you have an AWS account with necessary permissions (IAM Role or User with privileges).
2] Source Code: Prepare the web application repository hosted on GitHub/ BitBucket.
Pre-Deployment
3] Golden AMI:
- Launch an EC2 instance with a public subnet. (Ubuntu 24.0)
4] Install dependencies:
Update sudo and install Apache Web server, Git, CloudWatch Agent, and AWS SSM Agent.
Install Apache Web Server:
sudo yum install httpd

sudo enable systemctl httpd

sudo start systemctl httpd
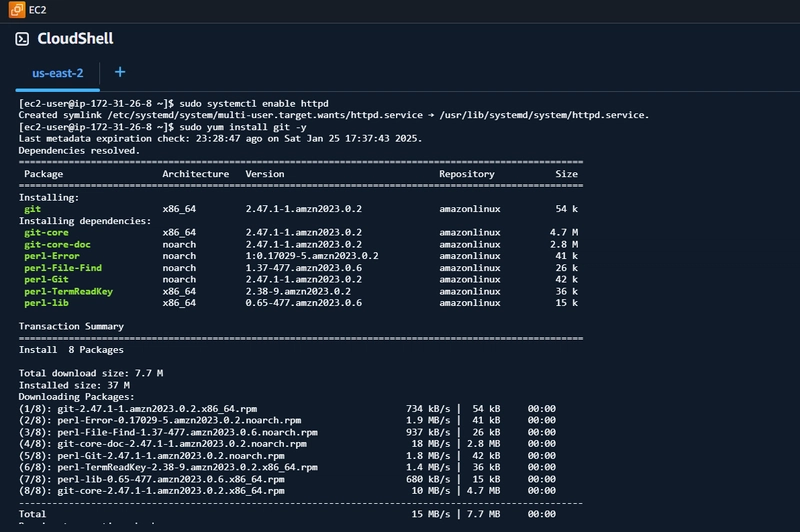
Install Git
sudo yum install git -y

git --version
Install CloudWatch Agent
□ Download the CloudWatch Agent- sudo yum install amazon-cloudwatch-agent
□ Configure and start the agent: - sudo systemctl enable amazon-cloudwatch-agent

□ Save the File: Ensure the file is saved at this path: /opt/aws/amazon-cloudwatch-agent/bin/memory_metrics.json.
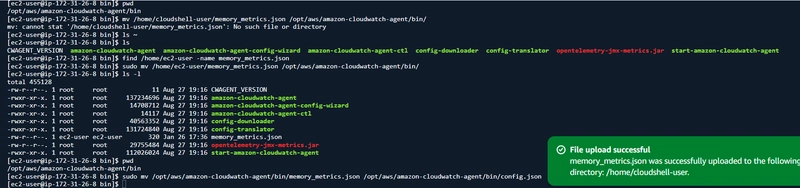
□ Example command to copy the file: sudo cp /home/ubuntu/VPC-Architecture/VPC Architecture/memory_metrics.json
/opt/aws/amazon-cloudwatch-agent/bin/memory_metrics.json
□ Apply the Configuration File: If you prefer to keep the file in the original location, run:
```sudo /opt/aws/amazon-cloudwatch-agent/bin/amazon-cloudwatch-agent-ctl -a fetch-config -m ec2 -c file:/home/ubuntu/VPC-Architecture/VPC\Architecture/memory_metrics.json -s

- Install AWS SSM Agent
□ Install the AWS SSM Agent - sudo yum install amazon-ssm-agent -y

□ Start and check status of cloud watch service: -
`sudo systemctl start amazon-cloudwatch-agent`
`sudo systemctl status amazon-cloudwatch-agent`

- Navigate to the **CloudWatch Dashboard** in AWS and go to **Metrics**. You should see the custom metrics created.

- Check the CloudWatch logs captured in amazon-cloudwatch-agent.log

5] **Create AMI - Amazon Master Image**
- Navigate to the AWS EC2 Dashboard.
- Select the Stopped EC2 Instance.
- From the Actions Menu, choose:
□ Image and templates > Create Image.
- Provide the following details:
□ Image Name: Give your AMI a descriptive name, e.g., GoldenAMI-v1.
□ Description: Mention what this AMI includes.
□ No Reboot: Leave unchecked (default) to ensure a clean AMI.
- Click Create Image and wait for the process to complete.

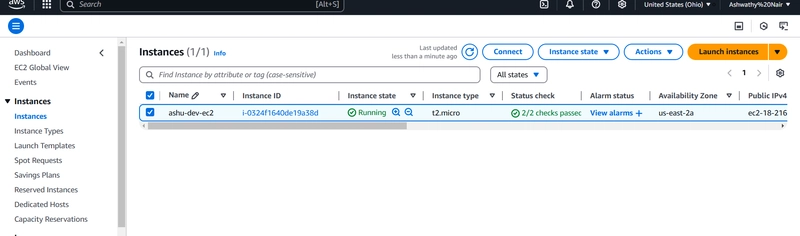
6] **Test the Golden AMI** by launching new EC2 instance with created AMI
- Launch an EC2 Instance from the Golden AMI
- Log in to your AWS Management Console.
- Go to the EC2 Dashboard.
- Click on Launch Instance and choose My AMIs.
- Select your Golden AMI and configure the instance settings:
□ Select an instance type (e.g., t2.micro for testing).
□ Attach the appropriate security group.
□ Assign a public IP for SSH testing.
□ Add necessary storage if required.
□ Assign an IAM role that matches your AMI's requirements (e.g., SSM access).
□ update the user data with script in the image


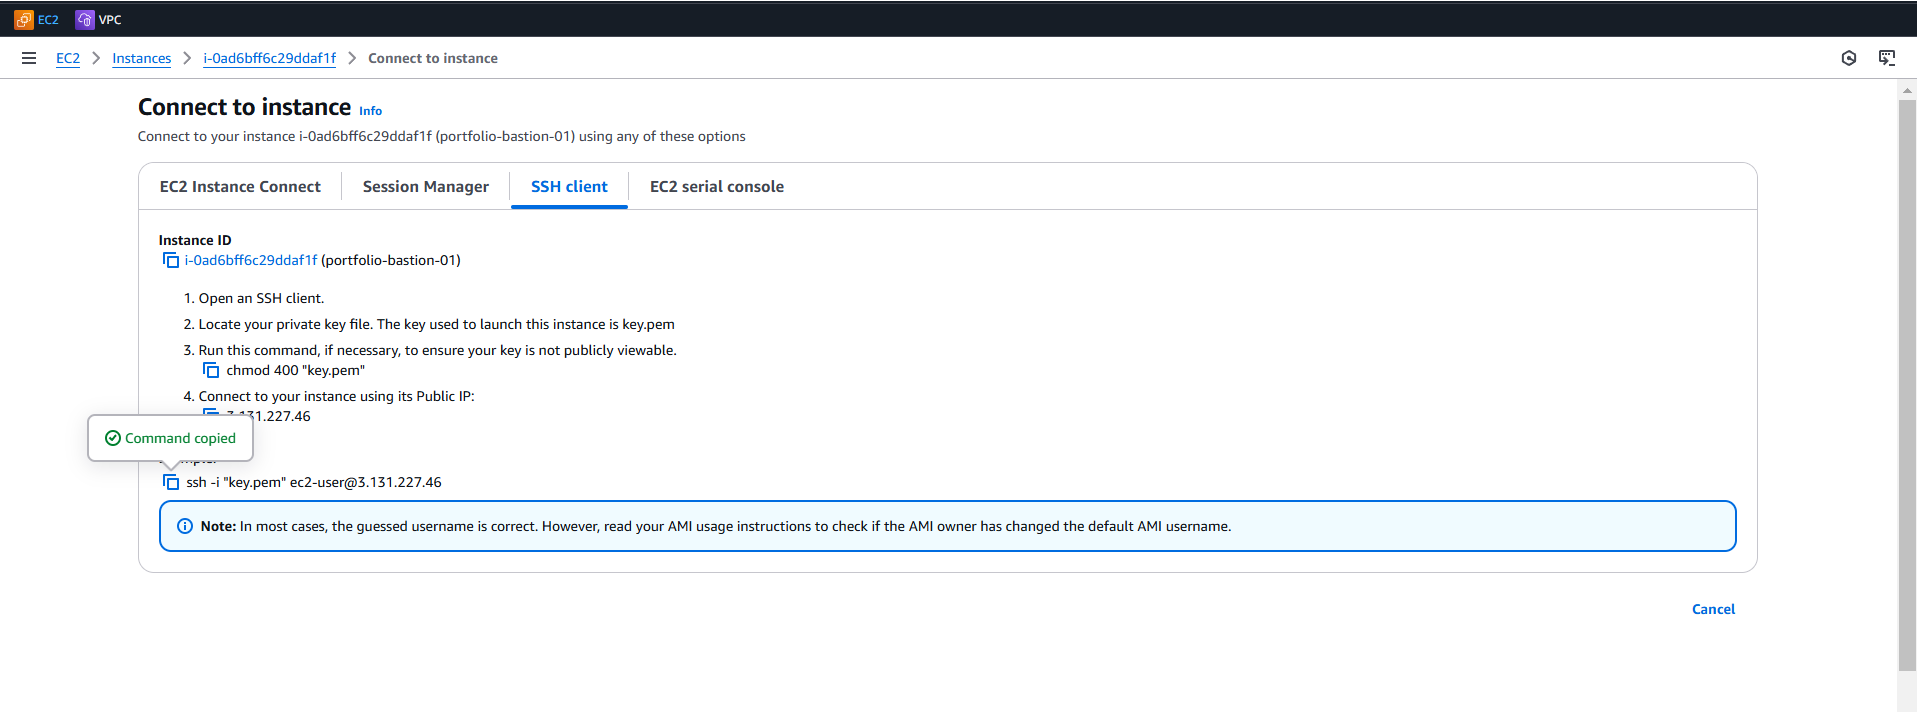
7] **Verify Connectivity**
- Connect to the instance using SSH :ssh -i "key_name.pem" ubuntu@ec2-18-222-53-96.us-east-2.compute.amazonaws.com
- Create a new IAM role and assign to EC2
**Step 1: Access the IAM Console**
1. Go to the IAM Console.
2. Click on the "Create role" button.
**Step 2: Specify Trusted Entity**
1. Select trusted entity type: Choose AWS service.
2. Use case for other AWS service: Select EC2.
3. Click Next.
**Step 3: Attach Policies**
1. Search for and select the following policies: _AmazonSSMManagedInstanceCore_ (required for SSM functionality) _CloudWatchAgentServerPolicy_ (if you're using CloudWatch Agent for monitoring).
2. Click Next.
**Step 4: Add Tags (Optional)**
1. Add any tags if required for identification or cost tracking.
2. Click Next.
**Step 5: Review and Create**
1. Provide a Role name: Example- **EC2_SSM_Access_Role**.
2. Review the permissions and confirm that AmazonSSMManagedInstanceCore is included.
3. Click Create role.
**Step 6: Attach Role to the EC2 Instance**
1. Go to the **EC2 Console**.
2. Select the instance you want to associate the role with.
3. Click Actions > Security > **Modify IAM Role**.
4. Select the newly created IAM role (**EC2_SSM_Access_Role**).
5. Click Update IAM role.

- Setup Permission for S3 bucket
□ Navigate to IAM, in the dashboard select Roles.
□ Click Create Role.
□ Select permission policies, AmazonS3ReadOnlyAccess and other required policies

## VPC Deployment
- Create VPC network ( 192.168.0.0/16 ) for Bastion Host deployment

- Create a VPC network ( 172.32.0.0/16 ) to deploy scalable application servers

- Access the VPC dashboard to display the created VPC

- Create Internet gateways to attach the gateways to Bastion app (ed-vpc-01)


- Create a public subnet for bastion app (ed-vpc-01) and configure the subnet

- Create a two public subnet and two private subnet for application server VPC (ed-vpc-02) with IP- 172.32.0.0/16 .
1. **Public Subnet 1 (ed-pub-sub-01)**: `172.32.1.0/24`
2. **Public Subnet 2 (ed-pub-sub-02)**: `172.32.2.0/24`
3. **Private Subnet 1 (ed-priv-sub-01)**: `172.32.3.0/24`
4. **Private Subnet 2 (ed-priv-sub-02)**: `172.32.4.0/24`


- Create NAT Gateway(ed-nat-gw-01) in Public Subnet (ed-pub-sub-02) and update Private Subnet associated Route Table accordingly to route the default traffic to NAT for outbound internet connection.


1. Create public route table (ed-rt-vpc-01-pub) for VPC (ed-vpc-01)

2. Create public route table (ed-rt-vpc-02-pub) for VPC (ed-vpc-02) 
3. Create private route table (ed-vpc-02-priv-01) for VPC (ed-vpc-02)

4. Subnet associated with route table (ed-rt-vpc-02-pub)

5. Subnet associated with route table (ed-rt-vpc-01-pub)

6. Subnet associated with route table (ed-rt-vpc-02-pub)

- Create Internet Gateway for each VPC and Public Subnet associated Route Table accordingly to route the default traffic to IGW for inbound/outbound internet connection.

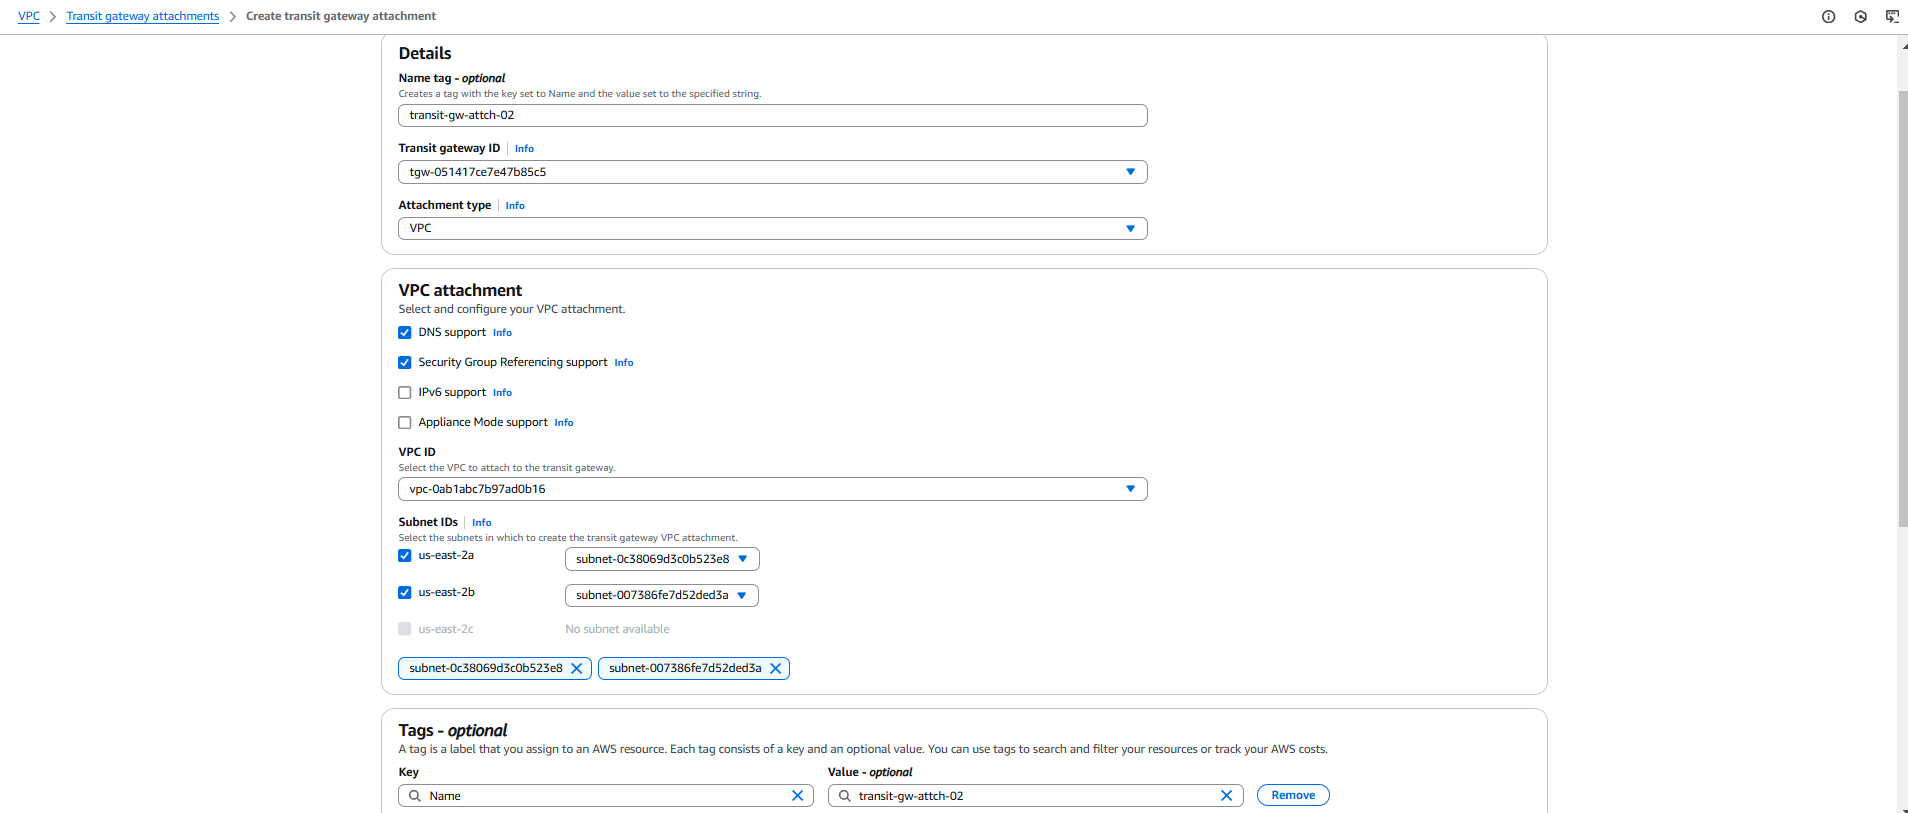
- Create Transit Gateway and associate both VPCs to the Transit Gateway for private communication.


- Create Cloudwatch Log Group with two Log Streams to store the VPC Flow Logs of both VPCs and enable Flow Logs for both VPCs and push the Flow Logs to Cloudwatch Log Groups and store the logs in the respective Log Stream for each VPC.


- Create Security Group for bastion host allowing port 22 from public.


- Create Target Group (tg-01) and associate it with ASG.

- Create Network Load balancer in Public Subnet and add Target Group as target.


- Create Auto Scaling Group with Min: 2 Max: 4 with two Private Subnets associated to 1a and 1b zones.


- Update route53 hosted zone with CNAME record routing the traffic to NLB. For that initially create record in Route53 > Hosted Zone

## Validation
- As DevOps Engineer login to Private Instances via Bastion Host.
- Login to AWS Session Manager and access the EC2 shell from console.