![[The AI Show Episode 142]: ChatGPT’s New Image Generator, Studio Ghibli Craze and Backlash, Gemini 2.5, OpenAI Academy, 4o Updates, Vibe Marketing & xAI Acquires X](https://www.marketingaiinstitute.com/hubfs/ep%20142%20cover.png)


![From drop-out to software architect with Jason Lengstorf [Podcast #167]](https://cdn.hashnode.com/res/hashnode/image/upload/v1743796461357/f3d19cd7-e6f5-4d7c-8bfc-eb974bc8da68.png?#)


.png?#)


_Christophe_Coat_Alamy.jpg?#)
 (1).webp?#)


![iPhone 17 Pro Won't Feature Two-Toned Back [Gurman]](https://www.iclarified.com/images/news/96944/96944/96944-640.jpg)
![Tariffs Threaten Apple's $999 iPhone Price Point in the U.S. [Gurman]](https://www.iclarified.com/images/news/96943/96943/96943-640.jpg)


Building an Isolated Application Environment on a Linux Server
Introduction: Understanding Containerization Hello Community, its wonderful moment being here and blogging for the first time, I choose to do my first with this DevOps task in HNG12-Stage 8, Building an Isolated Application Environment. This hands-on project transformed my understanding of containerization technologies and revealed the "magic" behind tools like Docker that we often take for granted. Containerization has become the backbone of modern application deployment, but have you ever wondered what's actually happening under the hood? While we can easily run docker run nginx and see a web server spring to life, the underlying mechanisms are a fascinating combination of Linux kernel features working in concert to create isolated environments. Imagine being able to run multiple applications on the same server, each believing it has its own private operating system, file system, and network—all while efficiently sharing the same physical resources. This is the power of containerization, and in this blog post, I'll demystify how it works by building a container system from scratch. Join me as we dive deep into the building blocks of containers and transform abstract concepts into working code. This step-by-step guide will illuminate the inner workings of one of modern computing's most transformative technologies. In this blog post, I'll take you through my implementation of a custom container system built from scratch using the foundational Linux technologies that power Docker and other container platforms. Why Containerization Matters Before diving into implementation, let's understand why containerization is so important: Consistency: Containers ensure applications run the same way across different environments. Isolation: Applications run in their own spaces without interfering with each other. Resource Efficiency: Containers share the host OS kernel, making them lighter than VMs. Scalability: Container orchestration allows easy scaling of applications. DevOps Enablement: Containers bridge development and operations by standardizing deployments. Project Overview: Building a Container System from Scratch This project involved creating a container system using Linux's native capabilities: Filesystem Isolation: Using chroot to create a separate root filesystem. Process Isolation: Using Linux namespaces to separate processes. Resource Limitations: Using cgroups to restrict CPU, memory, and other resources. Network Isolation: Creating separate network interfaces and routing. Step-by-Step Implementation Step 1: Setting Up the Environment First, I installed the necessary tools: sudo apt update sudo apt install -y util-linux debootstrap iptables iproute2 cgroup-tools net-tools curl Step 2: Creating a Container Root Filesystem I used debootstrap to create a minimal Ubuntu system for the container: mkdir -p container/rootfs sudo debootstrap --variant=minbase focal ~/container/rootfs/ echo "container" | sudo tee ~/container/rootfs/etc/hostname I then installed some basic utilities inside the container filesystem: sudo chroot container/rootfs/ apt update sudo chroot container/rootfs/ apt install -y python3 net-tools iputils-ping iproute2 curl sudo chroot container/rootfs/ useradd -m container-user Step 3: Implementing Resource Limitations with Cgroups Cgroups allow controlling the resources available to the container: # Create cgroups under each controller sudo mkdir -p /sys/fs/cgroup/cpu/container sudo mkdir -p /sys/fs/cgroup/memory/container sudo mkdir -p /sys/fs/cgroup/blkio/container sudo mkdir -p /sys/fs/cgroup/pids/container # Set CPU limit to 20% of one core echo 100000 | sudo tee /sys/fs/cgroup/cpu/container/cpu.cfs_period_us echo 20000 | sudo tee /sys/fs/cgroup/cpu/container/cpu.cfs_quota_us # Memory limit: 256MB echo 268435456 | sudo tee /sys/fs/cgroup/memory/container/memory.limit_in_bytes # Block I/O weight echo 500 | sudo tee /sys/fs/cgroup/blkio/container/blkio.weight # Maximum 100 processes echo 100 | sudo tee /sys/fs/cgroup/pids/container/pids.max Step 4: Setting Up Network Isolation I created a separate network namespace with virtual interfaces: # Create network namespace sudo ip netns add container_ns # Create veth pair (virtual network interfaces) sudo ip link add veth0 type veth peer name veth1 # Move veth1 to container namespace sudo ip link set veth1 netns container_ns # Configure interfaces sudo ip addr add 192.168.100.1/24 dev veth0 sudo ip link set veth0 up # Configure container interface sudo ip netns exec container_ns ip link set lo up sudo ip netns exec container_ns ip link set veth1 up sudo ip netns exec container_ns ip addr add 192.168.100.2/24 dev veth1 # Set up NAT for internet access OUTIF=$(ip route | grep default | awk '{print $5}') sudo iptables -t nat -A POSTROUTING -s 192.168.100.0/24 -o $OUTIF -j MASQUERADE sudo iptables
Introduction: Understanding Containerization
Hello Community, its wonderful moment being here and blogging for the first time, I choose to do my first with this DevOps task in HNG12-Stage 8, Building an Isolated Application Environment.
This hands-on project transformed my understanding of containerization technologies and revealed the "magic" behind tools like Docker that we often take for granted.
Containerization has become the backbone of modern application deployment, but have you ever wondered what's actually happening under the hood? While we can easily run docker run nginx and see a web server spring to life, the underlying mechanisms are a fascinating combination of Linux kernel features working in concert to create isolated environments.
Imagine being able to run multiple applications on the same server, each believing it has its own private operating system, file system, and network—all while efficiently sharing the same physical resources. This is the power of containerization, and in this blog post, I'll demystify how it works by building a container system from scratch.
Join me as we dive deep into the building blocks of containers and transform abstract concepts into working code. This step-by-step guide will illuminate the inner workings of one of modern computing's most transformative technologies. In this blog post, I'll take you through my implementation of a custom container system built from scratch using the foundational Linux technologies that power Docker and other container platforms.
Why Containerization Matters
Before diving into implementation, let's understand why containerization is so important:
- Consistency: Containers ensure applications run the same way across different environments.
- Isolation: Applications run in their own spaces without interfering with each other.
- Resource Efficiency: Containers share the host OS kernel, making them lighter than VMs.
- Scalability: Container orchestration allows easy scaling of applications.
- DevOps Enablement: Containers bridge development and operations by standardizing deployments.
Project Overview: Building a Container System from Scratch
This project involved creating a container system using Linux's native capabilities:
-
Filesystem Isolation: Using
chrootto create a separate root filesystem. - Process Isolation: Using Linux namespaces to separate processes.
- Resource Limitations: Using cgroups to restrict CPU, memory, and other resources.
- Network Isolation: Creating separate network interfaces and routing.
Step-by-Step Implementation
Step 1: Setting Up the Environment
First, I installed the necessary tools:
sudo apt update
sudo apt install -y util-linux debootstrap iptables iproute2 cgroup-tools net-tools curl
Step 2: Creating a Container Root Filesystem
I used debootstrap to create a minimal Ubuntu system for the container:
mkdir -p container/rootfs
sudo debootstrap --variant=minbase focal ~/container/rootfs/
echo "container" | sudo tee ~/container/rootfs/etc/hostname
I then installed some basic utilities inside the container filesystem:
sudo chroot container/rootfs/ apt update
sudo chroot container/rootfs/ apt install -y python3 net-tools iputils-ping iproute2 curl
sudo chroot container/rootfs/ useradd -m container-user
Step 3: Implementing Resource Limitations with Cgroups
Cgroups allow controlling the resources available to the container:
# Create cgroups under each controller
sudo mkdir -p /sys/fs/cgroup/cpu/container
sudo mkdir -p /sys/fs/cgroup/memory/container
sudo mkdir -p /sys/fs/cgroup/blkio/container
sudo mkdir -p /sys/fs/cgroup/pids/container

# Set CPU limit to 20% of one core
echo 100000 | sudo tee /sys/fs/cgroup/cpu/container/cpu.cfs_period_us
echo 20000 | sudo tee /sys/fs/cgroup/cpu/container/cpu.cfs_quota_us

# Memory limit: 256MB
echo 268435456 | sudo tee /sys/fs/cgroup/memory/container/memory.limit_in_bytes

# Block I/O weight
echo 500 | sudo tee /sys/fs/cgroup/blkio/container/blkio.weight

# Maximum 100 processes
echo 100 | sudo tee /sys/fs/cgroup/pids/container/pids.max
Step 4: Setting Up Network Isolation
I created a separate network namespace with virtual interfaces:
# Create network namespace
sudo ip netns add container_ns

# Create veth pair (virtual network interfaces)
sudo ip link add veth0 type veth peer name veth1

# Move veth1 to container namespace
sudo ip link set veth1 netns container_ns

# Configure interfaces
sudo ip addr add 192.168.100.1/24 dev veth0
sudo ip link set veth0 up

# Configure container interface
sudo ip netns exec container_ns ip link set lo up
sudo ip netns exec container_ns ip link set veth1 up
sudo ip netns exec container_ns ip addr add 192.168.100.2/24 dev veth1

# Set up NAT for internet access
OUTIF=$(ip route | grep default | awk '{print $5}')
sudo iptables -t nat -A POSTROUTING -s 192.168.100.0/24 -o $OUTIF -j MASQUERADE
sudo iptables -A FORWARD -i $OUTIF -o veth0 -j ACCEPT
sudo iptables -A FORWARD -o $OUTIF -i veth0 -j ACCEPT

# Enable IP forwarding
echo 1 | sudo tee /proc/sys/net/ipv4/ip_forward
Step 5: Creating the Container Init Script
This script runs inside the container to set up the environment:
# Create a script to run inside the chroot
sudo bash -c 'cat > container/rootfs/init.sh << EOF
#!/bin/bash
mount -t proc proc /proc
mount -t sysfs sys /sys
mount -t tmpfs tmpfs /tmp
/bin/bash
EOF'
sudo chmod +x container/rootfs/init.sh
Step 6: Creating a Container Entry Script
I created a script to launch the container with all isolation features:
#!/bin/bash
set -e

# First mount necessary filesystems inside container
sudo mkdir -p container/rootfs/proc container/rootfs/sys container/rootfs/dev container/rootfs/tmp

# Enter the container with proper namespace isolation
sudo cgexec -g cpu,memory,blkio,pids:container \
  ip netns exec container_ns \
  chroot container/rootfs /bin/bash -c "mount -t proc proc /proc && mount -t sysfs sys /sys && mount -t tmpfs tmpfs /tmp && echo 'Container shell starting...' && /bin/bash"
I saved this as enter_container.sh and made it executable:
sudo chmod +x enter_container.sh
Step 7: Deploying a Test Application
I created a simple Python web server to test the container:
sudo bash -c 'cat > container/rootfs/app.py << EOF
from http.server import HTTPServer, BaseHTTPRequestHandler
class SimpleHandler(BaseHTTPRequestHandler):
def do_GET(self):
self.send_response(200)
self.send_header("Content-type", "text/html")
self.end_headers()
self.wfile.write(b"Hello from Custom Container!
")
httpd = HTTPServer(("0.0.0.0", 8000), SimpleHandler)
print("Server running at http://0.0.0.0:8000")
httpd.serve_forever()
EOF'
How the Technologies Work Together
Linux Namespaces
Namespaces isolate different aspects of the container:
- PID Namespace: Containers see their own process IDs, starting from 1
- Network Namespace: Container has its own networking stack
- UTS Namespace: Container has its own hostname
- Mount Namespace: Container has its own mount points
- IPC Namespace: Container has its own inter-process communication mechanisms
In this implementation, I used ip netns for the network namespace and unshare (implicitly through chroot) for other namespaces.
Cgroups (Control Groups)
Cgroups limit the resources available to processes:
- CPU Cgroup: Limits CPU usage (20% in our case)
- Memory Cgroup: Limits memory usage (256MB in our case)
- Block I/O Cgroup: Controls disk read/write priority
- PID Cgroup: Limits the number of processes
I implemented these by creating cgroup directories and setting limit parameters.
Chroot
chroot changes the root directory for a process, isolating it from the host's filesystem. Our container sees only its own filesystem, starting at / which is actually container/rootfs/ on the host.
Challenges Faced and Solutions
Challenge 1: Permission Issues with Chroot
Initially, I encountered permission issues when trying to use chroot:
chroot: cannot change root directory to 'container/rootfs': Permission denied
Solution: I ensured proper permissions on the directory and used sudo where necessary. Additionally, I had to run the command with the right user (root) permissions.
Challenge 2: Network Namespace Issues
Setting up network namespaces was challenging, especially with this stuborn error:
Cannot find device "veth1"
Solution: I implemented a systematic approach to create and configure the network namespace and virtual interfaces, ensuring each step worked before proceeding.
Challenge 3: Cgroup Mounting Issues
I initially tried to create directories directly under /sys/fs/cgroup but encountered:
mkdir: cannot create directory '/sys/fs/cgroup/container': Read-only file system
Solution: I learned that in modern systems, cgroups have a specific hierarchy. I created controller-specific directories under each cgroup subsystem directory.
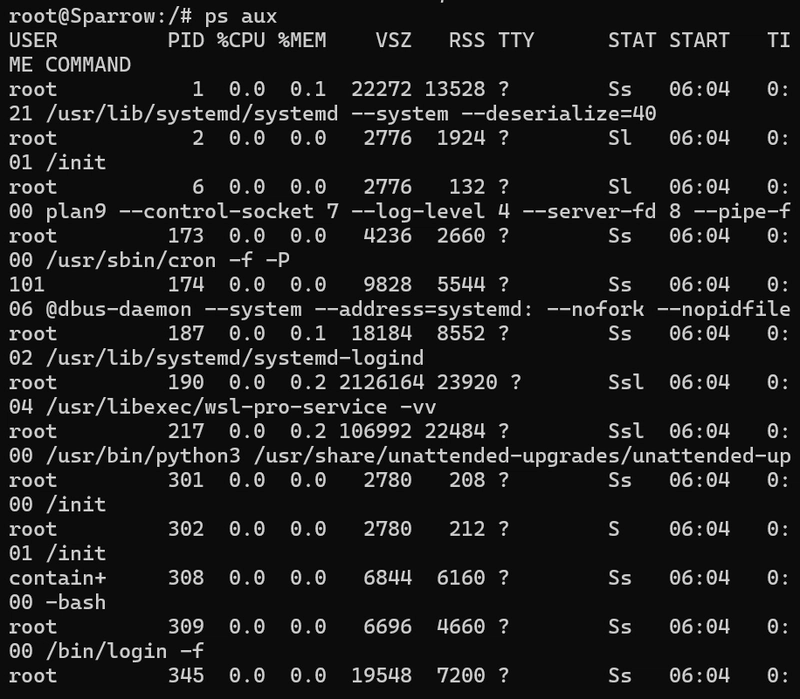
Demonstration of the Working Container
Test 1: Process Isolation
Inside the container, I ran ps aux and saw only container processes, not host processes.
Test 2: Network Isolation
The container had its own IP address (192.168.100.2) and network stack:
From host
ping 192.168.100.2
PING 192.168.100.2 (192.168.100.2) 56(84) bytes of data.
64 bytes from 192.168.100.2: icmp_seq=1 ttl=64 time=4.13 ms
Test 3: Resource Limitations
I verified cgroup restrictions were working:
Inside container
cat /sys/fs/cgroup/cpu/cpu.cfs_quota_us
# Shows 20000 (20% of CPU)
Test 4: Web Server Test
I ran the Python web server inside the container and accessed it from the host:
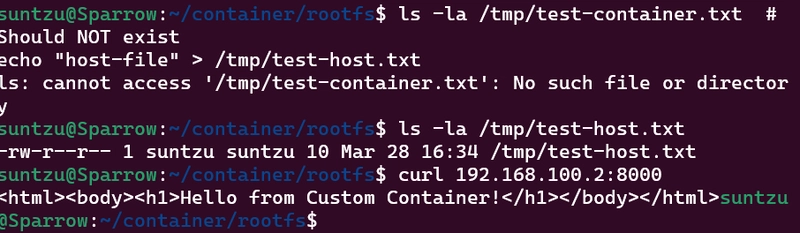
Conclusion
Building a container system from scratch provided deep insights into how containerization actually works. While Docker abstracts away these complexities, understanding the underlying technologies (namespaces, cgroups, and chroot) is invaluable for troubleshooting, optimization, and advanced containerization scenarios. This project demonstrated that containers are not magic—they're a clever combination of Linux kernel features that together provide application isolation, resource control, and portable deployments.
I know this was a long read but now atleast the next time you run docker run, you will remember that under the hood, Docker is utilizing these same Linux primitives to create the containerized environment, Thank you and see you next time.