![[The AI Show Episode 142]: ChatGPT’s New Image Generator, Studio Ghibli Craze and Backlash, Gemini 2.5, OpenAI Academy, 4o Updates, Vibe Marketing & xAI Acquires X](https://www.marketingaiinstitute.com/hubfs/ep%20142%20cover.png)


![From drop-out to software architect with Jason Lengstorf [Podcast #167]](https://cdn.hashnode.com/res/hashnode/image/upload/v1743796461357/f3d19cd7-e6f5-4d7c-8bfc-eb974bc8da68.png?#)


.png?#)


_Christophe_Coat_Alamy.jpg?#)
 (1).webp?#)


![Apple Considers Delaying Smart Home Hub Until 2026 [Gurman]](https://www.iclarified.com/images/news/96946/96946/96946-640.jpg)
![iPhone 17 Pro Won't Feature Two-Toned Back [Gurman]](https://www.iclarified.com/images/news/96944/96944/96944-640.jpg)
![Tariffs Threaten Apple's $999 iPhone Price Point in the U.S. [Gurman]](https://www.iclarified.com/images/news/96943/96943/96943-640.jpg)


Building an AI Agent to Manage Google Calendar with Spring AI
Introduction I often think about writing technical articles, especially those related to backend development with Spring Boot. However, I sometimes feel that everything is already available online, so why bother? As I pondered over this, I wanted to write about creating AI agents with Spring Boot but didn't want to build just another to-do list or weather app. One day, while praying, the idea came to me: why not explore using AI agents to manage Google Calendar? And that brings us here. This will be my first technical article, although I have projects on GitHub with well-written documentation, such as this one: Spring Boot Banking API. However, this will be my first blog post. Shall we? Requirements Functional Requirements Support OAuth 2.0 for Google authentication. Users must log in before accessing calendar features. Users can create, update, and delete Google Calendar events. AI extracts event details from natural language input. The agent must extract date, time, duration, attendees, and location from user queries. AI suggests available time slots and resolves conflicts. The system must support conversation history to maintain context across interactions. The system must allow users to confirm or reject agent recommendations before execution. The system must handle time zone conversions appropriately. Able to create a Google Meet link for an event and add attendees. Responses must be streamed to users instead of waiting for full completion. Non-functional Requirements Users log in once and remain authenticated via OAuth token refresh. The system must securely store OAuth tokens and user credentials. Logs all interactions and auto-retries failed requests. Tools Programming Language: Java Framework: Spring Boot Frontend Template Engine: Thymeleaf APIs: Google Calendar API(JAVA library) AI Model: OpenAI (you can choose your preferred model) Authentication and Authorization for Google Cloud APIs Google Cloud APIs support different types of authentication and authorization mechanisms. The most common one is OAuth 2.0. When an application needs to access a particular user's information, OAuth 2.0 is used to authenticate users, requiring their consent. Learn more about using OAuth 2.0 to access Google APIs. For this project, we will use OAuth 2.0. Getting Started Set up your environment on Google Cloud Console Follow the guide: Google Calendar API Quickstart for Java. Create your project and obtain credentials JSON We need to create credentials for OAuth Client ID with the application type set to Web application (not desktop). Set your redirect URL This should be an API endpoint in your backend that will handle token exchange. Example: http://localhost:8080/oauth2/callback. Alternatively, you can set it to your UI URL, but backend handling is preferred. Add a test user (since this app is not published) Navigate to APIs & Services > OAuth Consent Screen > Audience and add test users. Implementation in Spring Boot Configuring Google OAuth in Spring Boot First, download the OAuth credentials JSON file and place it under the resources directory in your Spring Boot project. Then, configure Google OAuth using the GoogleOAuthConfig class: @Bean public GoogleAuthorizationCodeFlow googleAuthorizationCodeFlow(HttpTransport httpTransport, DataStoreFactory dataStoreFactory) throws Exception { GoogleClientSecrets clientSecrets = GoogleClientSecrets.load(JSON_FACTORY, new InputStreamReader(Objects.requireNonNull(getClass().getResourceAsStream(CREDENTIALS_FILE_PATH)))); return new GoogleAuthorizationCodeFlow.Builder( httpTransport, JSON_FACTORY, clientSecrets, CalendarScopes.all()) .setDataStoreFactory(dataStoreFactory) .setAccessType("offline") // Ensures refresh token .setApprovalPrompt("force") // Forces Google to return a refresh token .build(); } Why Use setAccessType("offline") and setApprovalPrompt("force")? The .setAccessType("offline") parameter ensures we receive a refresh token, which is necessary to maintain long-term access without requiring the user to log in again. The .setApprovalPrompt("force") parameter forces Google to return a refresh token every time authorization is performed, which is essential for our requirement of keeping users logged in. Storing User Credentials To persist OAuth credentials, we use DataStoreFactory. For this example, we'll use an in-memory store, but in production, a database should be used. @Bean public DataStoreFactory dataStoreFactory() { return new InMemoryDataStoreFactory(); } We have a requirement to keep users logged in, so we store the credentials in memory using InMemoryDataStoreFactory. In production, you would use a database (RDBMS or NoSQL) for this purpose. To implemen
Introduction
I often think about writing technical articles, especially those related to backend development with Spring Boot. However, I sometimes feel that everything is already available online, so why bother? As I pondered over this, I wanted to write about creating AI agents with Spring Boot but didn't want to build just another to-do list or weather app.
One day, while praying, the idea came to me: why not explore using AI agents to manage Google Calendar? And that brings us here. This will be my first technical article, although I have projects on GitHub with well-written documentation, such as this one: Spring Boot Banking API. However, this will be my first blog post.
Shall we?
Requirements
Functional Requirements
- Support OAuth 2.0 for Google authentication.
- Users must log in before accessing calendar features.
- Users can create, update, and delete Google Calendar events.
- AI extracts event details from natural language input.
- The agent must extract date, time, duration, attendees, and location from user queries.
- AI suggests available time slots and resolves conflicts.
- The system must support conversation history to maintain context across interactions.
- The system must allow users to confirm or reject agent recommendations before execution.
- The system must handle time zone conversions appropriately.
- Able to create a Google Meet link for an event and add attendees.
- Responses must be streamed to users instead of waiting for full completion.
Non-functional Requirements
- Users log in once and remain authenticated via OAuth token refresh.
- The system must securely store OAuth tokens and user credentials.
- Logs all interactions and auto-retries failed requests.
Tools
- Programming Language: Java
- Framework: Spring Boot
- Frontend Template Engine: Thymeleaf
- APIs: Google Calendar API(JAVA library)
- AI Model: OpenAI (you can choose your preferred model)
Authentication and Authorization for Google Cloud APIs
Google Cloud APIs support different types of authentication and authorization mechanisms. The most common one is OAuth 2.0. When an application needs to access a particular user's information, OAuth 2.0 is used to authenticate users, requiring their consent. Learn more about using OAuth 2.0 to access Google APIs.
For this project, we will use OAuth 2.0.
Getting Started
-
Set up your environment on Google Cloud Console
- Follow the guide: Google Calendar API Quickstart for Java.
-
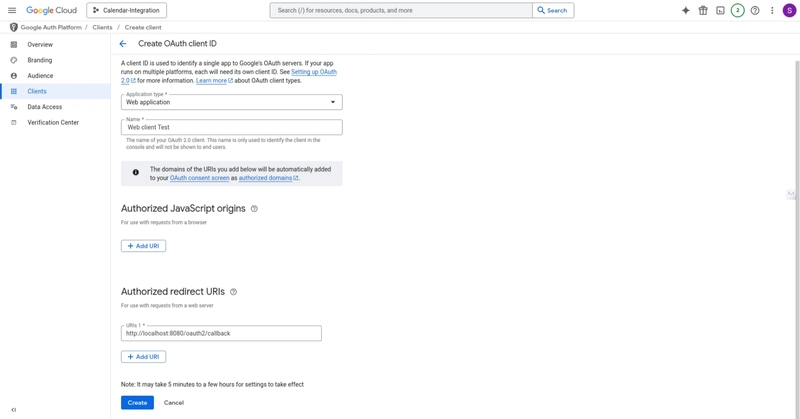
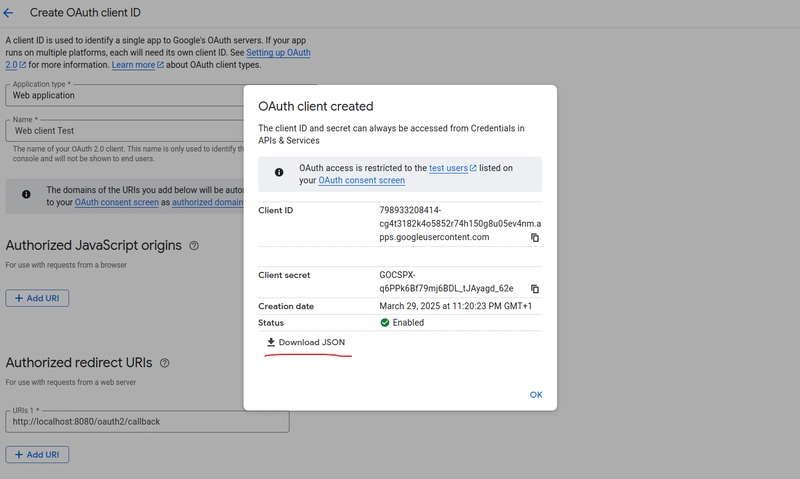
Create your project and obtain credentials JSON
- We need to create credentials for OAuth Client ID with the application type set to Web application (not desktop).
-
Set your redirect URL
- This should be an API endpoint in your backend that will handle token exchange.
- Example:
http://localhost:8080/oauth2/callback. - Alternatively, you can set it to your UI URL, but backend handling is preferred.

-
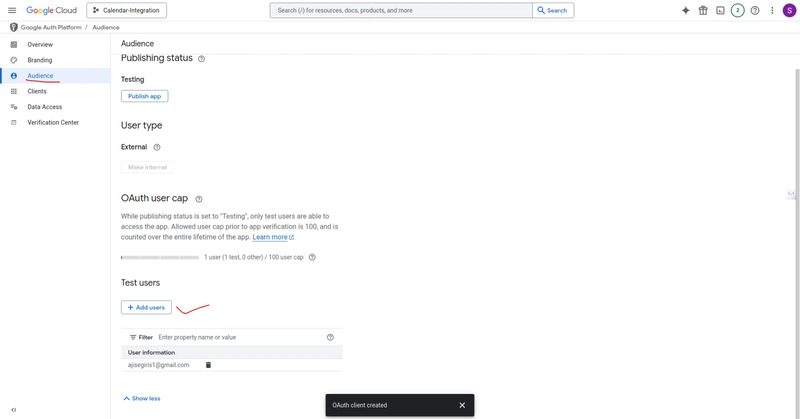
Add a test user (since this app is not published)
- Navigate to APIs & Services > OAuth Consent Screen > Audience and add test users.
Implementation in Spring Boot
Configuring Google OAuth in Spring Boot
First, download the OAuth credentials JSON file and place it under the resources directory in your Spring Boot project.
Then, configure Google OAuth using the GoogleOAuthConfig class:
@Bean
public GoogleAuthorizationCodeFlow googleAuthorizationCodeFlow(HttpTransport httpTransport, DataStoreFactory dataStoreFactory) throws Exception {
    GoogleClientSecrets clientSecrets = GoogleClientSecrets.load(JSON_FACTORY,
            new InputStreamReader(Objects.requireNonNull(getClass().getResourceAsStream(CREDENTIALS_FILE_PATH))));
    return new GoogleAuthorizationCodeFlow.Builder(
            httpTransport, JSON_FACTORY, clientSecrets, CalendarScopes.all())
            .setDataStoreFactory(dataStoreFactory)
            .setAccessType("offline")  // Ensures refresh token
            .setApprovalPrompt("force") // Forces Google to return a refresh token
            .build();
}
Why Use setAccessType("offline") and setApprovalPrompt("force")?
The .setAccessType("offline") parameter ensures we receive a refresh token, which is necessary to maintain long-term access without requiring the user to log in again. The .setApprovalPrompt("force") parameter forces Google to return a refresh token every time authorization is performed, which is essential for our requirement of keeping users logged in.
Storing User Credentials
To persist OAuth credentials, we use DataStoreFactory. For this example, we'll use an in-memory store, but in production, a database should be used.
@Bean
public DataStoreFactory dataStoreFactory() {
    return new InMemoryDataStoreFactory();
}
We have a requirement to keep users logged in, so we store the credentials in memory using InMemoryDataStoreFactory. In production, you would use a database (RDBMS or NoSQL) for this purpose. To implement this, simply implement the DataStoreFactory interface and set that in the bean configuration instead of InMemoryDataStoreFactory.
Managing OAuth Credentials
GoogleOAuthService manages our credentials. Let's look at a key method:
public Credential getStoredCredentials(String userId) throws IOException {
    Credential credential = googleAuthorizationCodeFlow.loadCredential(userId);
    if (credential != null && credential.getRefreshToken() != null) {
        Long expirationTime = credential.getExpirationTimeMilliseconds();
        if (expirationTime != null && expirationTime - System.currentTimeMillis() < 60000) {
            log.info("Refresh token expired for {} at {}", userId, expirationTime);
            boolean refreshed = credential.refreshToken();
            log.info("Refresh token refreshed: {}", refreshed);
            if (!refreshed) {
                throw new IOException("Failed to refresh access token");
            }
        }
        return credential;
    }
    return null;
}
Before making any request to Google, we retrieve the credential and check if it's valid or about to expire. If so, we refresh the token, which is elegantly handled with just a simple method call: credential.refreshToken().
Building the AI Agent
What is an AI Agent?
An AI agent is a software system capable of autonomously performing tasks, making decisions, and adapting based on data and user feedback. Organizations use AI agents to achieve specific goals and improve business outcomes. By delegating repetitive tasks to AI agents, business teams can focus on mission-critical or creative activities that add more value.
Using Tools in AI Agents
AI agents use tools to perform actions beyond language generation, such as retrieving data, running code, or communicating with remote services like sending emails or messages.
In our implementation, we provide our code information to the LLM (Large Language Model) so we(here Spring framework)can know which methods to invoke based on the user's prompt. For this scenario, I created a CalendarTools class.
When working with Spring AI, two crucial annotations are @Tool and @ToolParam. These annotations provide information and context to the LLM about your methods and fields:
@Tool(description = "This retrieves calendar events for a specific user. If startDate and endDate are not provided, set them to the current week. Dates are of JAVA LocalDateTime datatype.")
public EventsResponse getCalendarEvent(String userId, String startDate, String endDate,
                                      @ToolParam(required = false, description = "This is nextPageToken, It can be null") String page,
                                      @ToolParam(required = false, description = "The size of event users wants to see. Use default 100") Integer pageSize,
                                      ToolContext toolContext) {
   log.info("Getting calendar events - startDate: {}, endDate: {}, page: {}, pageSize: {}",
           startDate, endDate, page, pageSize != null ? pageSize : 1000);

   if (pageSize == null) {
       pageSize = 1000;
       log.debug("Using default pageSize: {}", pageSize);
   }

   try {
       log.debug("Fetching events with pageSize: {}", pageSize);
       var events = googleCalendarService.getEvents(userId, LocalDateTime.parse(startDate), LocalDateTime.parse(endDate), page, pageSize);
       log.info("Successfully retrieved {} events", events.getEvents() != null ? events.getEvents().size() : 0);
       return events;
   } catch (Exception e) {
       String errorMessage = NestedExceptionUtils.getMostSpecificCause(e).getMessage();
       log.error("Calendar error while retrieving events: {}", errorMessage, e);
       return new EventsResponse(null, null, errorMessage);
   }
}
It's essential to provide the LLM with as much information as possible so it can understand which fields are required and what the method does. For more information, check out the Spring AI Tools documentation.
Configuring the Chat Client
I added my calendar tools to the chat client:
.defaultAdvisors(
       new PromptChatMemoryAdvisor(chatMemory), // Chat Memory
       new LoggingAdvisor())
.defaultTools(calendarTools) // FUNCTION CALLING
.build();
Understanding Advisors
You might wonder about these advisors. The Spring AI Advisors API provides a flexible way to intercept, modify, and enhance AI-driven interactions in your Spring applications. If you've worked with HTTP interceptors, this concept is similar.
Since we're building a chatbot system, we need to pass all the conversations to the LLM to provide context. There are two approaches:
The UI stores all interactions and sends all messages to the backend every time. This is inefficient for many reasons, particularly latency and bandwidth.
The backend stores all information per session ID. For each session, when making a call to the LLM, we retrieve all session messages and pass them along to the user.
The second approach is preferable. Using PromptChatMemoryAdvisor tells the chat client to keep the information, and the chatMemory argument defines the implementation (in-memory, Redis, or RDBMS).
We also need to add:
.param(CHAT_MEMORY_CONVERSATION_ID_KEY, chatId)
This ensures we only see and set data belonging to that session.
The LoggingAdvisor is a custom implementation for setting customized logs as intended. Read more about the Spring Advisors API at the official documentation.
Running the Project
- Add your OpenAI API key in the properties file
- Add your Google credentials JSON to the resources directory (for web application)
- Configure your test email
- Run the project
- Go to
http://localhost:8080/oauth2/auth - The Auth URL will be returned; open the link and choose your test email
- You will be prompted to give your consent; do so, and the authorization code will be sent to the server and configured appropriately
- Head to the chatbot at
localhost:8080 - Interact with the bot
Conclusion
That's it! The code is straightforward to understand. If you have any questions, please leave a comment or reach out to me directly. If you'd like me to work on something else, feel free to suggest topics below - I'm open to ideas.
Clone the complete project here.
✨ See It In Action ✨
Watch Demo Video
Happy coding!