Bootstrap Your Web Server on AWS: A Deep Dive into EC2 User Data
Hey there! Have you ever thought about creating your own web server on the cloud? Well, you’re in for a treat because in this article, we’re going to explore how you can launch an EC2 instance and use HTTPD to host a simple web server. The best part? We’ll automate the installation of HTTPD using EC2 user data, so your web server is up and running as soon as your instance launches! EC2 User Data It is possible to bootstrap our instances using an EC2 User data(a piece of code you pass to the EC2 instance script). Bootstrapping means launching commands when a machine starts. That script is only run once at the instance's first start once and for all. The EC2 User Data Script runs with the root user; therefore, any commands you have will have the sudo rights EC2 user data is used to automate boot tasks such as: Installing updates Installing software Downloading common files from the internet Anything you can think of NB: The more you add into your user data script, the more your instance has to do at boot time Launch our first EC2 Instance running on Amazon Linux Go into the EC2 console and click the "Launch Instance" orange button Add a name and tag, e.g. "My First Instance". This helps you keep track of multiple instances while adding a personal touch to your cloud workspace. Choose a base image (operating system) for your EC2 instance. Choose from the Quickstart section, or you can browse more images of your choice. In my case, I have chosen the Amazon Linux 2023 AMI (Amazon Machine Image), which is Free Tier eligible. Leave architecture as default. Also, remember to check the default username for the AMI you select. Since you’ve chosen Amazon Linux, the default username is ec2-user. Keep this in mind for connecting to your instance later! Next, we need to choose the instance type Here I have a t2.micro selected.It is free tier eligible, so it will be free to launch for the entire month if I leave it running. Create a new key pair to log into my EC2 instance.It is necessary if you are going to use the SSH utility to access our instance. The key must be RSA-encrypted and the key file format must be .pem if you use Mac/Linux/Windows 10 and .ppk if you have windows with a version < 10(for use with PuTTY) Next, we have to configure our network settings. Create a new security group or use an existing security group. A security group is used to control our traffic for your instance, together with the rules you define for your security group. The first rule is to allow SSH traffic from anywhere and also allow HTTP traffic from the internet.

Hey there!
Have you ever thought about creating your own web server on the cloud? Well, you’re in for a treat because in this article, we’re going to explore how you can launch an EC2 instance and use HTTPD to host a simple web server. The best part? We’ll automate the installation of HTTPD using EC2 user data, so your web server is up and running as soon as your instance launches!

EC2 User Data
It is possible to bootstrap our instances using an EC2 User
data(a piece of code you pass to the EC2 instance script).Bootstrapping means launching commands when a machine starts.
That script is only run once at the instance's first start once and for all.The EC2 User Data Script runs with the root user; therefore, any commands you have will have the sudo rights
-
EC2 user data is used to automate boot tasks such as:
- Installing updates
- Installing software
- Downloading common files from the internet
- Anything you can think of
NB: The more you add into your user data script, the more your instance has to do at boot time
Launch our first EC2 Instance running on Amazon Linux
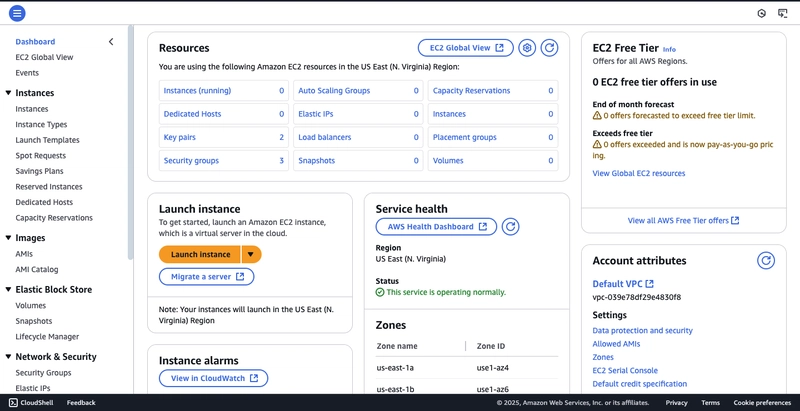
- Go into the EC2 console and click the "Launch Instance" orange button
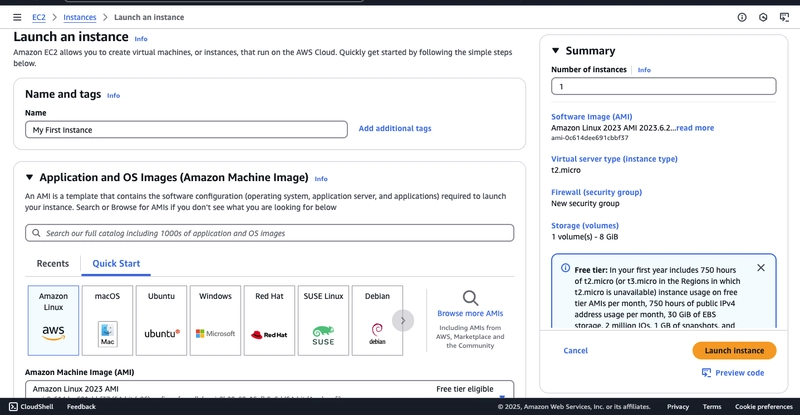
Add a name and tag, e.g. "My First Instance". This helps you keep track of multiple instances while adding a personal touch to your cloud workspace.
Choose a base image (operating system) for your EC2 instance. Choose from the Quickstart section, or you can browse more images of your choice.
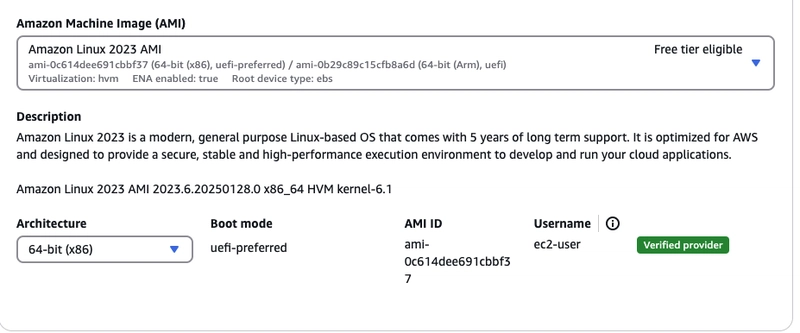
In my case, I have chosen the Amazon Linux 2023 AMI (Amazon Machine Image), which is Free Tier eligible.
- Leave architecture as default. Also, remember to check the default username for the AMI you select. Since you’ve chosen Amazon Linux, the default username is ec2-user. Keep this in mind for connecting to your instance later!
Next, we need to choose the instance type
Here I have a t2.micro selected.It is free tier eligible, so it will be free to launch for the entire month if I leave it running.
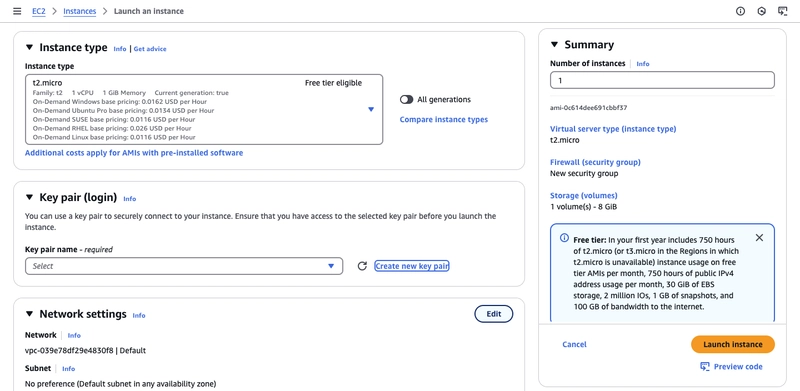
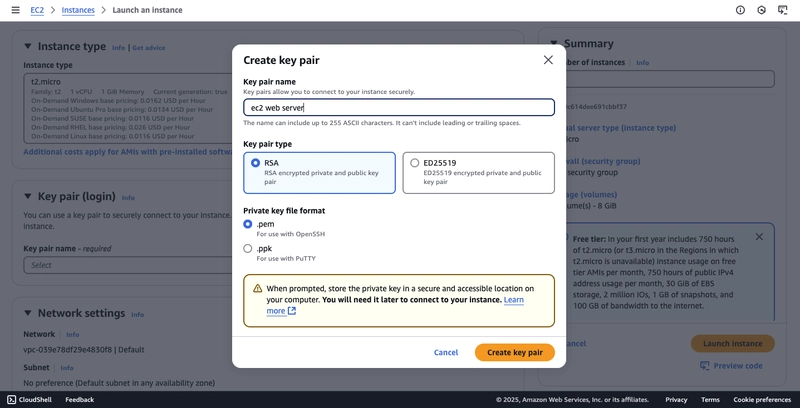
Create a new key pair to log into my EC2 instance.It is necessary if you are going to use the SSH utility to access our instance.
The key must be RSA-encrypted and the key file format must be .pem if you use Mac/Linux/Windows 10 and .ppk if you have windows with a version < 10(for use with PuTTY)
Next, we have to configure our network settings.
- Create a new security group or use an existing security group. A security group is used to control our traffic for your instance, together with the rules you define for your security group. The first rule is to allow SSH traffic from anywhere and also allow HTTP traffic from the internet.


![[The AI Show Episode 142]: ChatGPT’s New Image Generator, Studio Ghibli Craze and Backlash, Gemini 2.5, OpenAI Academy, 4o Updates, Vibe Marketing & xAI Acquires X](https://www.marketingaiinstitute.com/hubfs/ep%20142%20cover.png)





![[DEALS] The Premium Learn to Code Certification Bundle (97% off) & Other Deals Up To 98% Off – Offers End Soon!](https://www.javacodegeeks.com/wp-content/uploads/2012/12/jcg-logo.jpg)


![From drop-out to software architect with Jason Lengstorf [Podcast #167]](https://cdn.hashnode.com/res/hashnode/image/upload/v1743796461357/f3d19cd7-e6f5-4d7c-8bfc-eb974bc8da68.png?#)


.png?#)


_Christophe_Coat_Alamy.jpg?#)
 (1).webp?#)


![Apple Considers Delaying Smart Home Hub Until 2026 [Gurman]](https://www.iclarified.com/images/news/96946/96946/96946-640.jpg)
![iPhone 17 Pro Won't Feature Two-Toned Back [Gurman]](https://www.iclarified.com/images/news/96944/96944/96944-640.jpg)
![Tariffs Threaten Apple's $999 iPhone Price Point in the U.S. [Gurman]](https://www.iclarified.com/images/news/96943/96943/96943-640.jpg)


