


![[The AI Show Episode 144]: ChatGPT’s New Memory, Shopify CEO’s Leaked “AI First” Memo, Google Cloud Next Releases, o3 and o4-mini Coming Soon & Llama 4’s Rocky Launch](https://www.marketingaiinstitute.com/hubfs/ep%20144%20cover.png)


_Andreas_Prott_Alamy.jpg?width=1280&auto=webp&quality=80&disable=upscale#)


![What features do you get with Gemini Advanced? [April 2025]](https://i0.wp.com/9to5google.com/wp-content/uploads/sites/4/2024/02/gemini-advanced-cover.jpg?resize=1200%2C628&quality=82&strip=all&ssl=1)


![Apple Shares Official Trailer for 'Long Way Home' Starring Ewan McGregor and Charley Boorman [Video]](https://www.iclarified.com/images/news/97069/97069/97069-640.jpg)
![Apple Watch Series 10 Back On Sale for $299! [Lowest Price Ever]](https://www.iclarified.com/images/news/96657/96657/96657-640.jpg)
![EU Postpones Apple App Store Fines Amid Tariff Negotiations [Report]](https://www.iclarified.com/images/news/97068/97068/97068-640.jpg)


![Mobile Legends: Bang Bang [MLBB] Free Redeem Codes April 2025](https://www.talkandroid.com/wp-content/uploads/2024/07/Screenshot_20240704-093036_Mobile-Legends-Bang-Bang.jpg)


AWS VPC Setup: Public & Private Subnets with IGW, NAT, and EC2
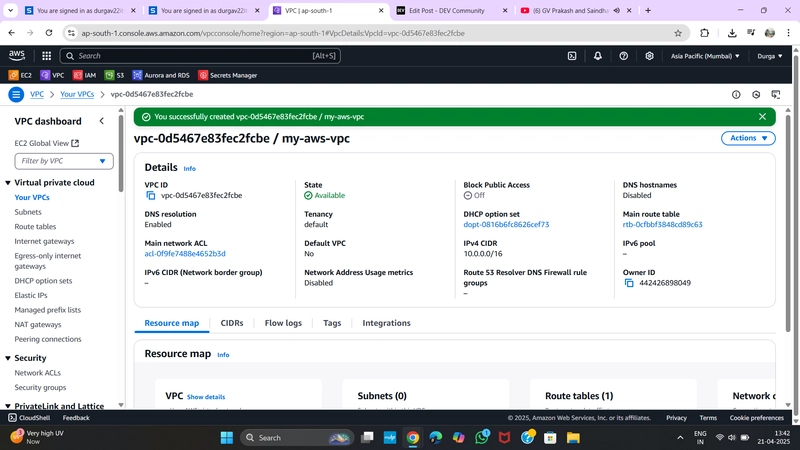
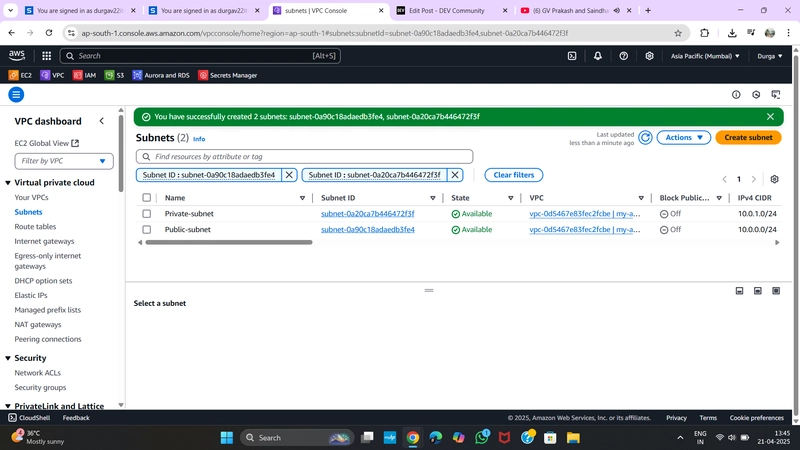
Setting up a Virtual Private Cloud (VPC) is foundational when deploying resources in AWS securely. This guide walks you through creating: A VPC Public & Private Subnets Internet Gateway NAT Gateway Route Tables Optional EC2 Instances ✅ 1. Create a VPC Go to VPC Dashboard > Your VPCs > Create VPC Choose VPC only Name: MyVPC IPv4 CIDR block: 10.0.0.0/16 Leave other fields as default Click Create VPC ✅ 2. Create Subnets Navigate to Subnets > Create Subnet ➤ Public Subnet: Name: PublicSubnet VPC: MyVPC AZ: ap-south-1a CIDR block: 10.0.1.0/24 ➤ Private Subnet: Name: PrivateSubnet VPC: MyVPC AZ: ap-south-1b CIDR block: 10.0.2.0/24 ✅ 3. Create and Attach Internet Gateway Go to Internet Gateways > Create Internet Gateway Name: MyIGW Click Attach to VPC and select MyVPC ✅ 4. Create a Public Route Table Go to Route Tables > Create Route Table Name: PublicRT VPC: MyVPC Select PublicRT > Routes > Edit Routes Add route: Destination: 0.0.0.0/0 Target: Internet Gateway → MyIGW Go to Subnet Associations > Edit Subnet Associations Select: PublicSubnet ✅ 5. Allocate Elastic IP (EIP) Go to Elastic IPs > Allocate Elastic IP Note the allocation ID ✅ 6. Create NAT Gateway Go to NAT Gateways > Create NAT Gateway Name: MyNATGW Subnet: PublicSubnet Elastic IP: select the one you just allocated ⏳ Wait a few minutes for the NAT Gateway to become active. ✅ 7. Create a Private Route Table Go to Route Tables > Create Route Table Name: PrivateRT VPC: MyVPC Select PrivateRT > Routes > Edit Routes Add route: Destination: 0.0.0.0/0 Target: NAT Gateway → MyNATGW Go to Subnet Associations Attach PrivateSubnet ✅ 8. Launch EC2 Instances (Optional) ➤ Public EC2: AMI: Amazon Linux 2 Network: MyVPC, Subnet: PublicSubnet Auto-assign Public IP: Enabled Security Group: Allow SSH (port 22) from your IP ➤ Private EC2: Same AMI Subnet: PrivateSubnet Auto-assign Public IP: Disabled ✅ SSH Connection Established Use your terminal to SSH into the public instance, and from there connect to the private one using its private IP. ⚠️ Troubleshooting Tip If you're unable to connect: Check your Security Group's inbound rules: Type: SSH Protocol: TCP Port: 22 Source: My IP or 0.0.0.0/0 (for open access - use carefully!)
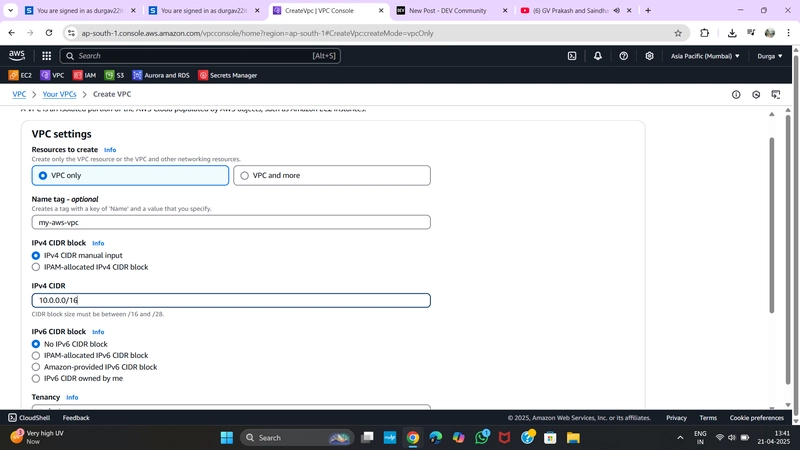
Setting up a Virtual Private Cloud (VPC) is foundational when deploying resources in AWS securely. This guide walks you through creating:
- A VPC
- Public & Private Subnets
- Internet Gateway
- NAT Gateway
- Route Tables
- Optional EC2 Instances
✅ 1. Create a VPC
- Go to VPC Dashboard > Your VPCs > Create VPC
- Choose VPC only
- Name:
MyVPC - IPv4 CIDR block:
10.0.0.0/16 - Leave other fields as default
- Click Create VPC
✅ 2. Create Subnets
Navigate to Subnets > Create Subnet
➤ Public Subnet:
- Name:
PublicSubnet - VPC:
MyVPC - AZ:
ap-south-1a - CIDR block:
10.0.1.0/24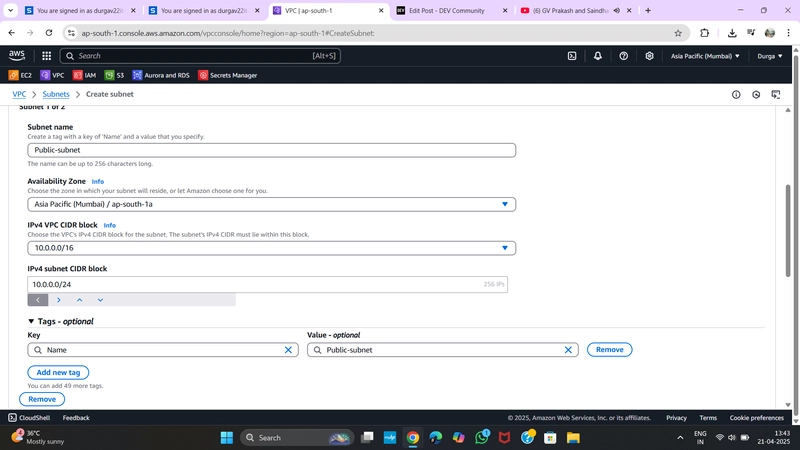
➤ Private Subnet:
- Name:
PrivateSubnet - VPC:
MyVPC - AZ:
ap-south-1b - CIDR block:
10.0.2.0/24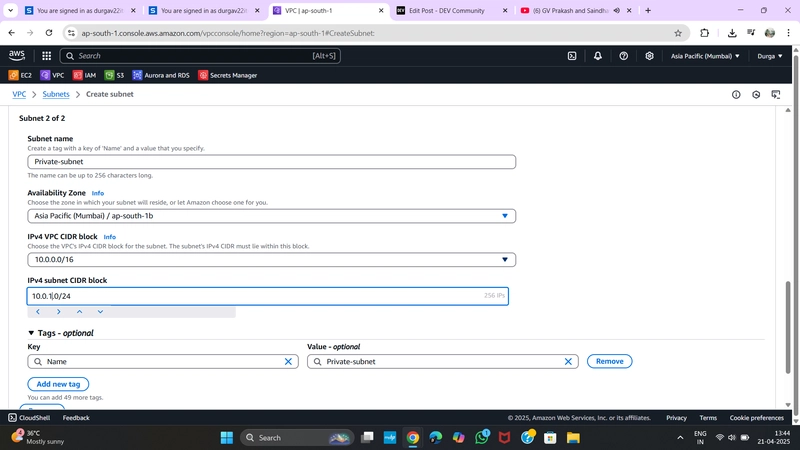
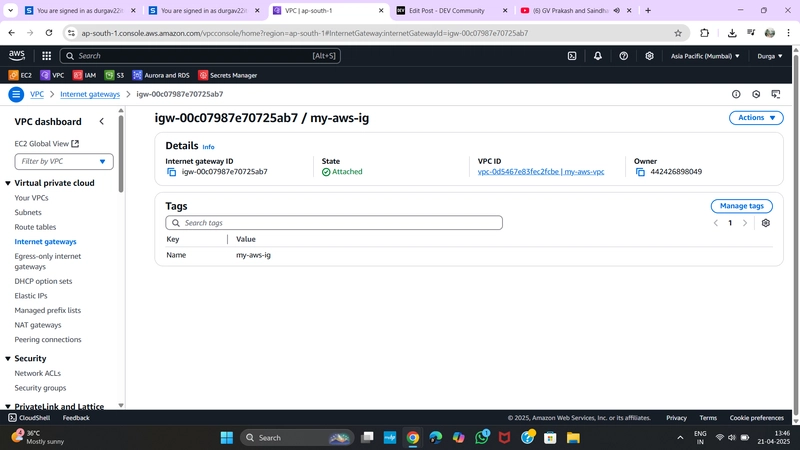
✅ 3. Create and Attach Internet Gateway
- Go to Internet Gateways > Create Internet Gateway
- Name:
MyIGW
- Name:
- Click Attach to VPC and select
MyVPC
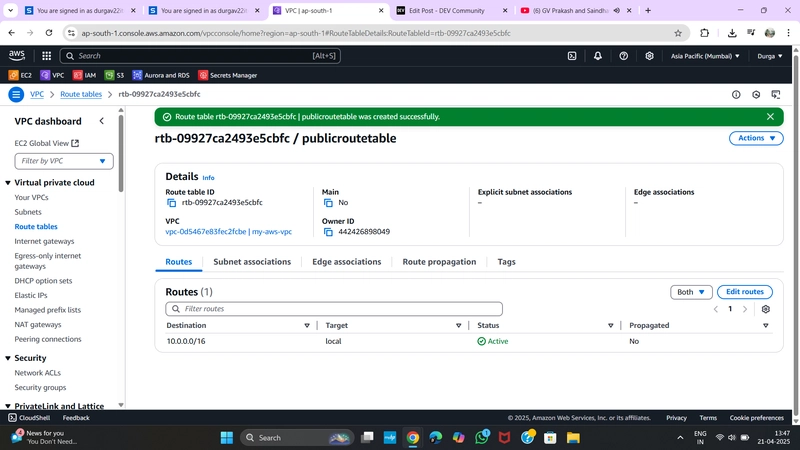
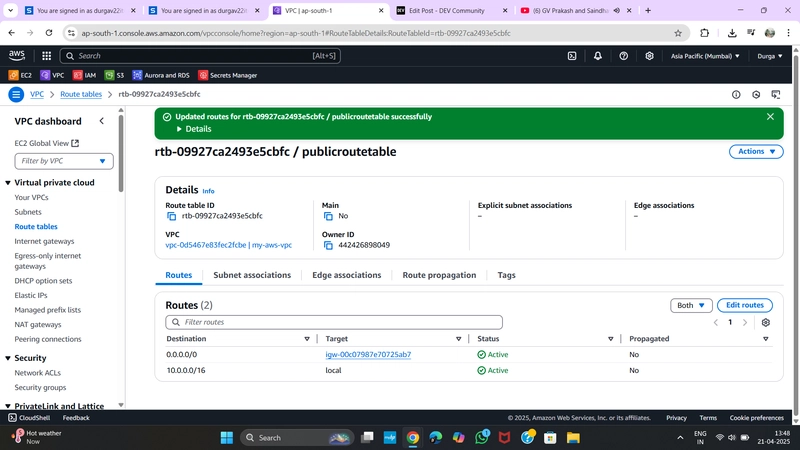
✅ 4. Create a Public Route Table
-
Go to Route Tables > Create Route Table
- Name:
PublicRT - VPC:
MyVPC
- Name:
-
Select
PublicRT> Routes > Edit Routes- Add route:
- Destination:
0.0.0.0/0 - Target: Internet Gateway →
MyIGW
- Destination:
- Add route:
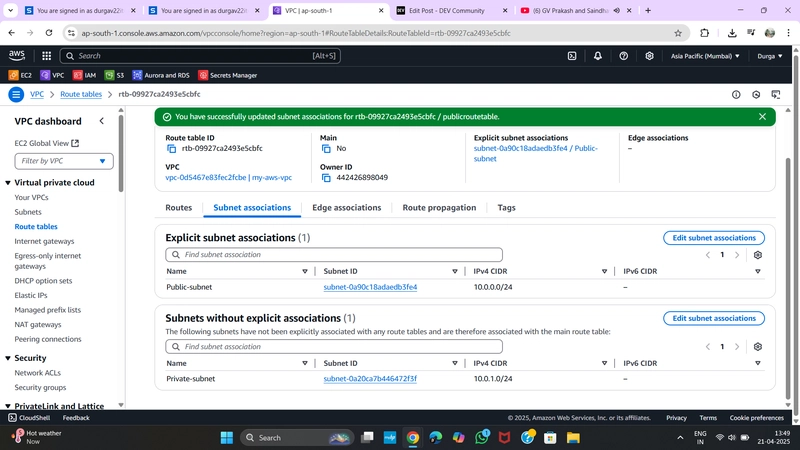
- Go to Subnet Associations > Edit Subnet Associations
- Select:
PublicSubnet
- Select:
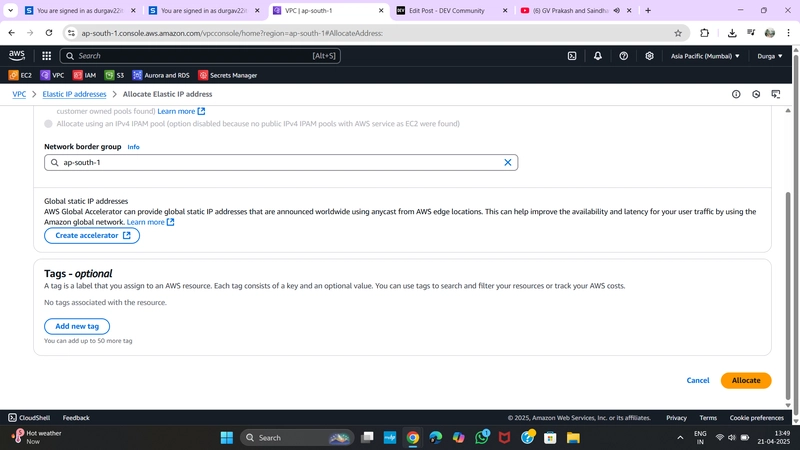
✅ 5. Allocate Elastic IP (EIP)
- Go to Elastic IPs > Allocate Elastic IP
- Note the allocation ID

✅ 6. Create NAT Gateway
- Go to NAT Gateways > Create NAT Gateway
- Name:
MyNATGW - Subnet:
PublicSubnet - Elastic IP: select the one you just allocated
- Name:

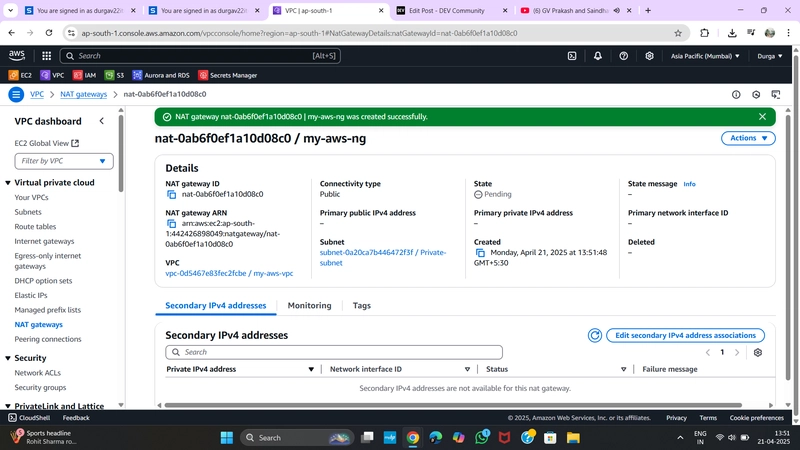
⏳ Wait a few minutes for the NAT Gateway to become active.
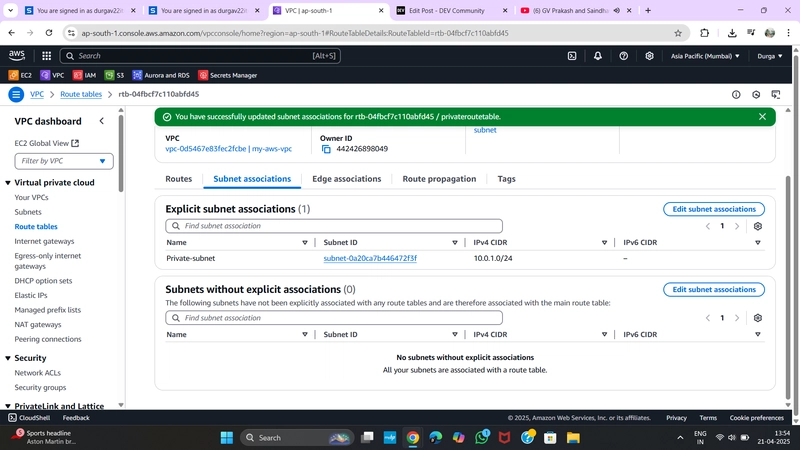
✅ 7. Create a Private Route Table
-
Go to Route Tables > Create Route Table
- Name:
PrivateRT - VPC:
MyVPC
- Name:
-
Select
PrivateRT> Routes > Edit Routes- Add route:
- Destination:
0.0.0.0/0 - Target: NAT Gateway →
MyNATGW
- Destination:
- Add route:

- Go to Subnet Associations
- Attach
PrivateSubnet
- Attach
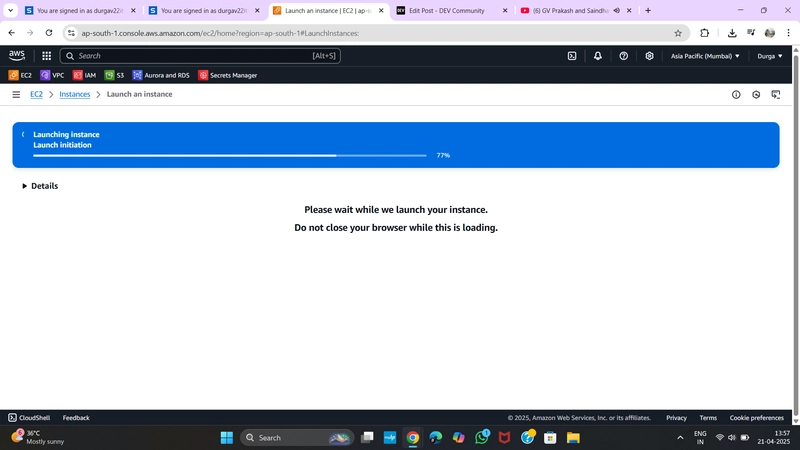
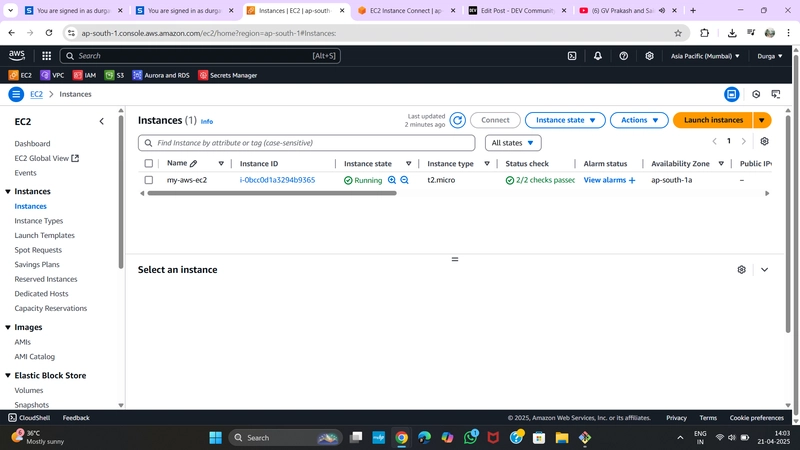
✅ 8. Launch EC2 Instances (Optional)
➤ Public EC2:
- AMI: Amazon Linux 2
- Network:
MyVPC, Subnet:PublicSubnet - Auto-assign Public IP: Enabled
- Security Group: Allow SSH (port 22) from your IP
➤ Private EC2:
- Same AMI
- Subnet:
PrivateSubnet - Auto-assign Public IP: Disabled
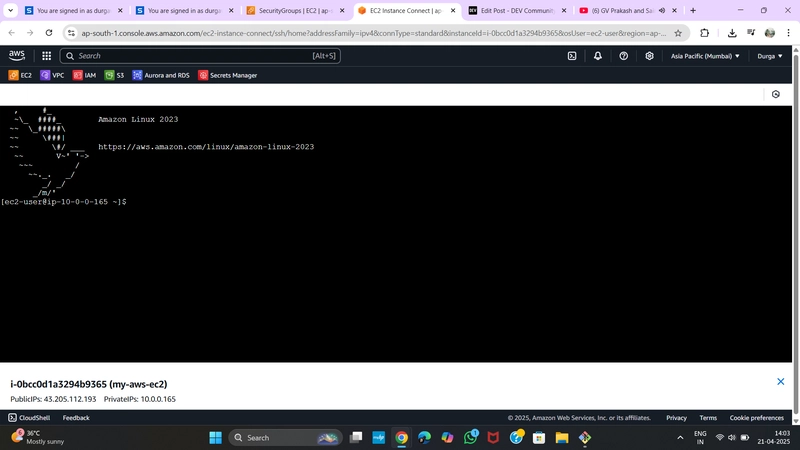
✅ SSH Connection Established
Use your terminal to SSH into the public instance, and from there connect to the private one using its private IP.
⚠️ Troubleshooting Tip
If you're unable to connect:
- Check your Security Group's inbound rules:
- Type: SSH
- Protocol: TCP
- Port: 22
- Source:
My IPor0.0.0.0/0(for open access - use carefully!)
![[Boost]](https://media2.dev.to/dynamic/image/width=800%2Cheight=%2Cfit=scale-down%2Cgravity=auto%2Cformat=auto/https%3A%2F%2Fdev-to-uploads.s3.amazonaws.com%2Fuploads%2Fuser%2Fprofile_image%2F1209000%2F6cedc05f-7d51-4cc5-ba41-d145719edc47.jpg)