![[The AI Show Episode 142]: ChatGPT’s New Image Generator, Studio Ghibli Craze and Backlash, Gemini 2.5, OpenAI Academy, 4o Updates, Vibe Marketing & xAI Acquires X](https://www.marketingaiinstitute.com/hubfs/ep%20142%20cover.png)


![From drop-out to software architect with Jason Lengstorf [Podcast #167]](https://cdn.hashnode.com/res/hashnode/image/upload/v1743796461357/f3d19cd7-e6f5-4d7c-8bfc-eb974bc8da68.png?#)


.png?#)


_Christophe_Coat_Alamy.jpg?#)
 (1).webp?#)


![iPhone 17 Pro Won't Feature Two-Toned Back [Gurman]](https://www.iclarified.com/images/news/96944/96944/96944-640.jpg)
![Tariffs Threaten Apple's $999 iPhone Price Point in the U.S. [Gurman]](https://www.iclarified.com/images/news/96943/96943/96943-640.jpg)


Adding a Splash Screen to Your Flutter App with `flutter_native_splash`
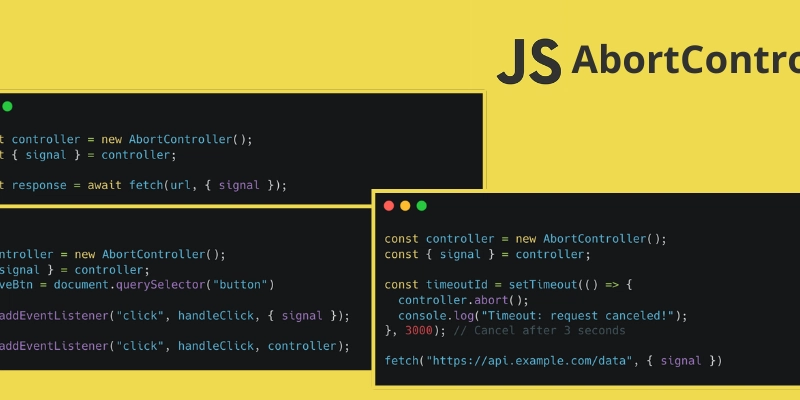
A splash screen is an important component of mobile apps, as it gives the user a smooth transition while your app is loading. In Flutter, adding a splash screen is made easy with the flutter_native_splash package. This package allows you to customize the splash screen and ensures it looks great on both Android and iOS. Here’s how you can add a splash screen to your Flutter app using flutter_native_splash. ✅ Step 1: Install flutter_native_splash To get started, add the flutter_native_splash package to your pubspec.yaml file. Run the following command in your terminal: flutter pub add flutter_native_splash Alternatively, manually add the package by including it in your pubspec.yaml file under dependencies: dependencies: flutter_native_splash: ^2.0.5 # Check the latest version Once added, run: flutter pub get ✅ Step 2: Configure Splash Screen Settings After adding the package, you need to configure it by providing the necessary customization options. These configurations go in the pubspec.yaml file under the flutter_native_splash section. Here's an example configuration: flutter_native_splash: color: "#42a5f5" # Background color of the splash screen image: assets/images/splash_logo.png # Path to your logo or splash image android: true # Enable splash screen for Android ios: true # Enable splash screen for iOS android_gravity: center # Position of the image on Android (center, bottom, etc.) ios_content_mode: scaleAspectFit # Position of the image on iOS (scaleAspectFit, scaleToFill, etc.) fullscreen: true # Enable full-screen mode (removes the status bar) web: false # Disable splash screen for web # Optional advanced configuration android_12: image: assets/images/splash_logo.png icon_background_color: "#ffffff" icon_gravity: center In this configuration: color defines the background color of your splash screen. image points to the logo or splash image you want to show. android and ios enable the splash screen on respective platforms. fullscreen allows your splash screen to cover the entire screen. You can also specify gravity/content mode to position the splash screen content on both Android and iOS. Make sure your image path is correct and placed in the appropriate directory. You can adjust the color and image path as per your design needs. ✅ Step 3: Generate the Splash Screen Once you've configured everything, run the following command to generate the splash screen assets: flutter pub run flutter_native_splash:create This command will automatically generate the necessary files for both Android and iOS, updating their respective native folders. For Android, it modifies AndroidManifest.xml and the res folder with the required assets. For iOS, it updates the LaunchScreen.storyboard. ✅ Step 4: Testing the Splash Screen Now that your splash screen is set up, you can run your Flutter app to see the result: flutter run When your app starts, you should see the custom splash screen before your main app interface loads. ✅ Step 5: Optional: Customizing Splash Screen Duration If you want to control how long the splash screen stays visible, you can add some extra configuration in your Dart code. However, by default, the splash screen stays visible until Flutter has finished loading the app. To extend the splash screen duration, you can use WidgetsBinding.instance.ensureInitialized() in the main.dart file: void main() async { WidgetsFlutterBinding.ensureInitialized(); await Future.delayed(const Duration(seconds: 2)); // Delay splash screen for 2 seconds runApp(MyApp()); } This will show the splash screen for an additional 2 seconds before loading the main app. ✅ Step 6: Removing the Splash Screen In case you no longer need the splash screen and want to remove it, simply run the following command: flutter pub run flutter_native_splash:remove This command will remove all splash screen-related configurations and files.

A splash screen is an important component of mobile apps, as it gives the user a smooth transition while your app is loading. In Flutter, adding a splash screen is made easy with the flutter_native_splash package. This package allows you to customize the splash screen and ensures it looks great on both Android and iOS.
Here’s how you can add a splash screen to your Flutter app using flutter_native_splash.
✅ Step 1: Install flutter_native_splash
To get started, add the flutter_native_splash package to your pubspec.yaml file. Run the following command in your terminal:
flutter pub add flutter_native_splash
Alternatively, manually add the package by including it in your pubspec.yaml file under dependencies:
dependencies:
  flutter_native_splash: ^2.0.5  # Check the latest version
Once added, run:
flutter pub get
✅ Step 2: Configure Splash Screen Settings
After adding the package, you need to configure it by providing the necessary customization options. These configurations go in the pubspec.yaml file under the flutter_native_splash section.
Here's an example configuration:
flutter_native_splash:
  color: "#42a5f5"  # Background color of the splash screen
  image: assets/images/splash_logo.png  # Path to your logo or splash image
  android: true  # Enable splash screen for Android
  ios: true  # Enable splash screen for iOS
  android_gravity: center  # Position of the image on Android (center, bottom, etc.)
  ios_content_mode: scaleAspectFit  # Position of the image on iOS (scaleAspectFit, scaleToFill, etc.)
  fullscreen: true  # Enable full-screen mode (removes the status bar)
  web: false  # Disable splash screen for web

  # Optional advanced configuration
  android_12:
    image: assets/images/splash_logo.png
    icon_background_color: "#ffffff"
    icon_gravity: center
In this configuration:
-
colordefines the background color of your splash screen. -
imagepoints to the logo or splash image you want to show. -
androidandiosenable the splash screen on respective platforms. -
fullscreenallows your splash screen to cover the entire screen. - You can also specify gravity/content mode to position the splash screen content on both Android and iOS.
Make sure your image path is correct and placed in the appropriate directory. You can adjust the color and image path as per your design needs.
✅ Step 3: Generate the Splash Screen
Once you've configured everything, run the following command to generate the splash screen assets:
flutter pub run flutter_native_splash:create
This command will automatically generate the necessary files for both Android and iOS, updating their respective native folders.
For Android, it modifies AndroidManifest.xml and the res folder with the required assets. For iOS, it updates the LaunchScreen.storyboard.
✅ Step 4: Testing the Splash Screen
Now that your splash screen is set up, you can run your Flutter app to see the result:
flutter run
When your app starts, you should see the custom splash screen before your main app interface loads.
✅ Step 5: Optional: Customizing Splash Screen Duration
If you want to control how long the splash screen stays visible, you can add some extra configuration in your Dart code. However, by default, the splash screen stays visible until Flutter has finished loading the app.
To extend the splash screen duration, you can use WidgetsBinding.instance.ensureInitialized() in the main.dart file:
void main() async {
  WidgetsFlutterBinding.ensureInitialized();
  await Future.delayed(const Duration(seconds: 2));  // Delay splash screen for 2 seconds
  runApp(MyApp());
}
This will show the splash screen for an additional 2 seconds before loading the main app.
✅ Step 6: Removing the Splash Screen
In case you no longer need the splash screen and want to remove it, simply run the following command:
flutter pub run flutter_native_splash:remove
This command will remove all splash screen-related configurations and files.