


![[The AI Show Episode 144]: ChatGPT’s New Memory, Shopify CEO’s Leaked “AI First” Memo, Google Cloud Next Releases, o3 and o4-mini Coming Soon & Llama 4’s Rocky Launch](https://www.marketingaiinstitute.com/hubfs/ep%20144%20cover.png)


_Andreas_Prott_Alamy.jpg?width=1280&auto=webp&quality=80&disable=upscale#)


![What features do you get with Gemini Advanced? [April 2025]](https://i0.wp.com/9to5google.com/wp-content/uploads/sites/4/2024/02/gemini-advanced-cover.jpg?resize=1200%2C628&quality=82&strip=all&ssl=1)


![Apple Shares Official Trailer for 'Long Way Home' Starring Ewan McGregor and Charley Boorman [Video]](https://www.iclarified.com/images/news/97069/97069/97069-640.jpg)
![Apple Watch Series 10 Back On Sale for $299! [Lowest Price Ever]](https://www.iclarified.com/images/news/96657/96657/96657-640.jpg)
![EU Postpones Apple App Store Fines Amid Tariff Negotiations [Report]](https://www.iclarified.com/images/news/97068/97068/97068-640.jpg)


![Mobile Legends: Bang Bang [MLBB] Free Redeem Codes April 2025](https://www.talkandroid.com/wp-content/uploads/2024/07/Screenshot_20240704-093036_Mobile-Legends-Bang-Bang.jpg)


MCP client - Step by Step Guide to Building from Scratch
In my previous guide, we explored building MCP servers. Today, we'll explore MCP client development (based on a request by readers*),* the critical bridge between AI applications and external systems. In this blog, we will build a custom client from scratch using available tools. But before that, a quick refresher on MCP! Revisiting MCP MCP stands for Model Context Protocol. It is a universal protocol developed by Anthropic to provide a standardised way to connect to tools, resources, local storage, databases and much more. Think of it as a type-C connector but for LLMS. Here is a minor breakdown of the data flow in MCP: The AI model sends a request (e.g., "fetch user profile data"). The MCP client forwards the request to the appropriate MCP server. The MCP server retrieves the required data from a database or API. The response is sent back to the AI model via the MCP client. MCP client displays the output in the terminal / UI MCP works on client-server architecture, which means you can define your own server and client. In this blog, our focus will be solely on the MCP Client. But why build one? Why Custom Client? Proprietary clients are good and provide support for general use cases. So why opt for custom MCP Clients? The reason for having a custom MCP Client is that it can help organisations to: Connect to internal or proprietary tools that aren’t supported by default. Meet strict security or compliance requirements like GDPR. Provide real-time data and context to the AI, for more accurate answers within internal tools Stay vendor-agnostic to reduce future maintenance, i.e., switch seamlessly between multiple tools. Experiment with innovative ai workflows. However, one should only opt for a custom MCP client when they require tailored integrations, enhanced security, or specific functionalities not addressed by standard solutions. Having understood the necessity, let’s understand how MCP Client works. How does the MCP Client work? MCP client lifecycle can be summarized into three steps: Connect, Exchange, Terminate. Connect: The client initiates the connection by sending its protocol version and capabilities. Handshake: In response, the server responds with its own, establishing a handshake. Exchange: Once connected, the client and server can exchange messages through request-response or one-way notifications/alerts for data exchange. Terminate: If something goes wrong, like errors, lost networks or if the client/ server connection is closed, the connection terminates. To learn more, you can refer to this GitHub repo. Anyway, theory would be useless without practice, so let’s build a custom MCP client from scratch! Building a Custom MCP Client using Langchain & Gemini MCP is built on top of a tool calling and client-server structure, making it ideal for integrating with any LLM that supports Tool Calling. So, for the sake of simplicity and open source, we will use Google Gemini Models as LLMS and Langchain MCP Adapters to abstract out tool-calling format conversion. The Client will be a terminal-based client that connects to any MCP Server, enables conversations, and executes the tool process. Let’s begin by creating our workspace. Workspace Setup We start by creating a parent directory, mcp, and 3 child directories - services, clients and workspace. Servers store all the MCP servers. The client stores all clients. & Workspace stores the results of the MCP client-server interaction, usually actions. You can do it manually or open the terminal and execute all the commands one by one: >mkdir mcp > cd mcp > mkdir servers clients workspace Ensure your directory structure looks similar to image below: Next create a virtual environment in mcp using: # windows cd mcp python -m venv .venv # linux/mac cd mcp python -m venv --help sudo apt-get install python3-venv #install venv - optional python3 -m venv .venv Now activate the environment with: # activates env .venv\\Scripts\\activate # linux/mac source .venv/bin/activate Ensure you see (.venv) infront of the terminal cwd path. Next add all the required libraries: pip install langchain langchain_mcp_adapters langgraph langchain_google_genai google-generativeai python-dotenv You can also use requirements.txt method to perform the same. Next navigate to the client's folder and create a .env file > cd clients > copy con .env # windows > touch .env # linux/macc Now populate it with GOOGLE_API_KEY. To get one go to Google AI Studio > Get API Key > Create API Key > Select Project > Create API Key in Existing Product. A new pop up will open with API Key, copy it and paste it in place of your-api-key . GOOGLE_API_KEY=your-api-key Note: You may need to a login to google and create a new project with AI API access to get one. Finally open the project in any IDE of your choice, I am using VS Code: > c
In my previous guide, we explored building MCP servers. Today, we'll explore MCP client development (based on a request by readers*),* the critical bridge between AI applications and external systems.
In this blog, we will build a custom client from scratch using available tools.
But before that, a quick refresher on MCP!
Revisiting MCP
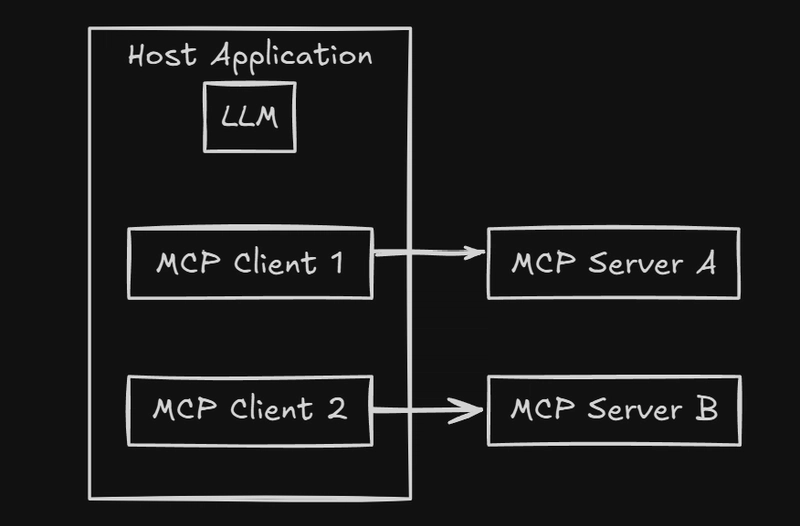
MCP stands for Model Context Protocol. It is a universal protocol developed by Anthropic to provide a standardised way to connect to tools, resources, local storage, databases and much more. Think of it as a type-C connector but for LLMS.
Here is a minor breakdown of the data flow in MCP:
- The AI model sends a request (e.g., "fetch user profile data").
- The MCP client forwards the request to the appropriate MCP server.
- The MCP server retrieves the required data from a database or API.
- The response is sent back to the AI model via the MCP client.
- MCP client displays the output in the terminal / UI
MCP works on client-server architecture, which means you can define your own server and client. In this blog, our focus will be solely on the MCP Client.
But why build one?
Why Custom Client?
Proprietary clients are good and provide support for general use cases. So why opt for custom MCP Clients?
The reason for having a custom MCP Client is that it can help organisations to:
- Connect to internal or proprietary tools that aren’t supported by default.
- Meet strict security or compliance requirements like GDPR.
- Provide real-time data and context to the AI, for more accurate answers within internal tools
- Stay vendor-agnostic to reduce future maintenance, i.e., switch seamlessly between multiple tools.
- Experiment with innovative ai workflows.
However, one should only opt for a custom MCP client when they require tailored integrations, enhanced security, or specific functionalities not addressed by standard solutions.
Having understood the necessity, let’s understand how MCP Client works.
How does the MCP Client work?

MCP client lifecycle can be summarized into three steps: Connect, Exchange, Terminate.
- Connect: The client initiates the connection by sending its protocol version and capabilities.
- Handshake: In response, the server responds with its own, establishing a handshake.
- Exchange: Once connected, the client and server can exchange messages through request-response or one-way notifications/alerts for data exchange.
- Terminate: If something goes wrong, like errors, lost networks or if the client/ server connection is closed, the connection terminates.
To learn more, you can refer to this GitHub repo.
Anyway, theory would be useless without practice, so let’s build a custom MCP client from scratch!
Building a Custom MCP Client using Langchain & Gemini
MCP is built on top of a tool calling and client-server structure, making it ideal for integrating with any LLM that supports Tool Calling.
So, for the sake of simplicity and open source, we will use Google Gemini Models as LLMS and Langchain MCP Adapters to abstract out tool-calling format conversion.
The Client will be a terminal-based client that connects to any MCP Server, enables conversations, and executes the tool process.
Let’s begin by creating our workspace.
Workspace Setup
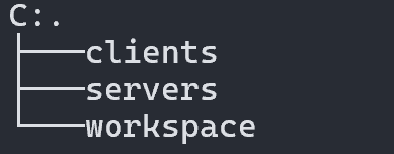
We start by creating a parent directory, mcp, and 3 child directories - services, clients and workspace.
- Servers store all the MCP servers.
- The client stores all clients.
- & Workspace stores the results of the MCP client-server interaction, usually actions.
You can do it manually or open the terminal and execute all the commands one by one:
>mkdir mcp
> cd mcp
> mkdir servers clients workspace
Ensure your directory structure looks similar to image below:
Next create a virtual environment in mcp using:
# windows
cd mcp
python -m venv .venv

# linux/mac
cd mcp
python -m venv --help
sudo apt-get install python3-venv #install venv - optional
python3 -m venv .venv
Now activate the environment with:
# activates env
.venv\\Scripts\\activate

# linux/mac
source .venv/bin/activate
Ensure you see (.venv) infront of the terminal cwd path.
Next add all the required libraries:
pip install langchain langchain_mcp_adapters langgraph langchain_google_genai google-generativeai python-dotenv
You can also use requirements.txt method to perform the same.
Next navigate to the client's folder and create a .env file
> cd clients
> copy con .env # windows
> touch .env # linux/macc
Now populate it with GOOGLE_API_KEY. To get one go to Google AI Studio > Get API Key > Create API Key > Select Project > Create API Key in Existing Product.
A new pop up will open with API Key, copy it and paste it in place of your-api-key .
GOOGLE_API_KEY=your-api-key
Note: You may need to a login to google and create a new project with AI API access to get one.
Finally open the project in any IDE of your choice, I am using VS Code:
> cd ..
> code .
Make sure after all step the directory structure looks similar to the image